I have been using After Effects much more lately, and every time I use it I feel that I do like it… but part of it just make me cringe. What better way to feel better about something than to unload the burden of keeping things inside. So it is in that spirit that I put together a quick list of 11 things that could change After Effects for the better.
This article will be about the seemingly smaller things, that affect workflow – Not the rhetorical topics that always float out there when the question is asked “what needs to change in After Effects”. You know the “true 3D environment”, the “more standard Graph Editor”, and the other heavy hitters.
In actuality, After Effects has come out swinging with some really heavy-hitting features. There have been some really innovative stuff in recent releases that suggest movement in the right direction. The Global Performance Cache, new rotoscoping tools and the more recent work in building masks features are all great innovations not only in workflow, but also stand out at technical marvels.
A Short Disclaimer
I have no claims to being an After Effects wizard, and most likely there might be workarounds or something that I have missed or overlooked or simply don’t know about the Application.
Certainly this article can serve as an avenue for discussion, but the only way to have a voice is to send Adobe a Feature Request / Bug Report form, which is the proper and official way to communicate ideas with Adobe.
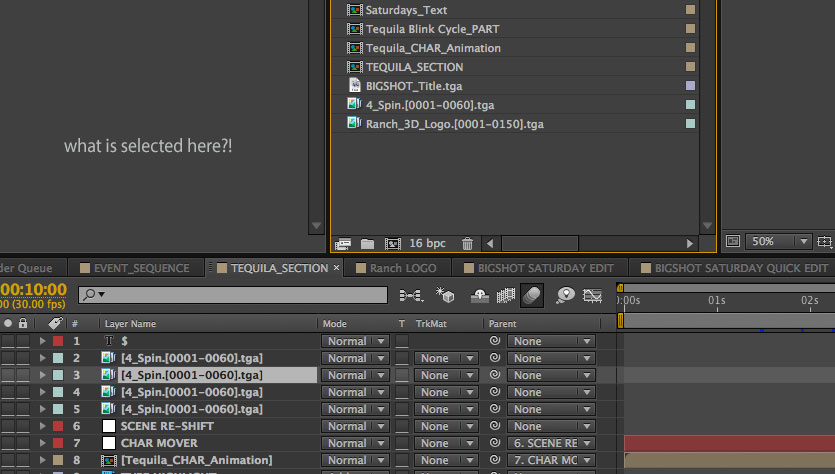
Import Image Sequences
Importing a sequence of images in After Effects is something that we all do quite a bit, so the importance here has a bit more weight.
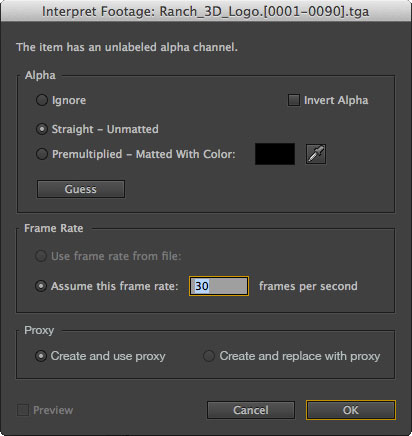
I often find myself working with multiple frame rates in a project, either for versioning or simple flexibility. As an example, I may render out 4 animations from a 3D application at 24, 48 and 60 FPS for one project in After Effects that is 30 frames per second. Having animations at a higher frame-rate will allow a greater range of flexibility in altering the speed either through time remapping or straight up time scale.
The problem is that After Effects has one setting for applying a frame rate to image sequences. The setting is buried deep in the import section of the application preferences. Other than changing that setting, you need to import the sequence, then find it in the project window, then right click or use the hotkey to bring up the “Interpret Footage” dialog box to change it.
What if the Import Sequence dialog box can be expanded to include setting a frame rate along side the alpha channel interpretation settings that are already there? Taking that concept a step further, maybe there could be some method for automatically creating a proxy and video clip at the same time, while importing.
The Case for Non-Modal Windows
Having everything modal in After Effects is kind of a pain. Simply by opening up all the windows to being a non-modal window, you may increase workflow and declutter the interface practically everywhere.
For those that don’t know, a modal window in computing terms is a window that will lock out other aspects of the application until it is acknowledged or dealt with – it requires you to interact with it before returning to the main application.
All windows in After Effects are modal – the Interpret Footage, Edit Solid setting, edit keyframe setting dialogs for example, all require you to change some settings and then dismiss the dialog to be able to affect any other item in the main application window.
But what if you didn’t have to? What if all the dialogs in After Effects were Non-Modal or Modeless? Not only would that speed a few things up, but it would also declutter the interface in quite a few places.
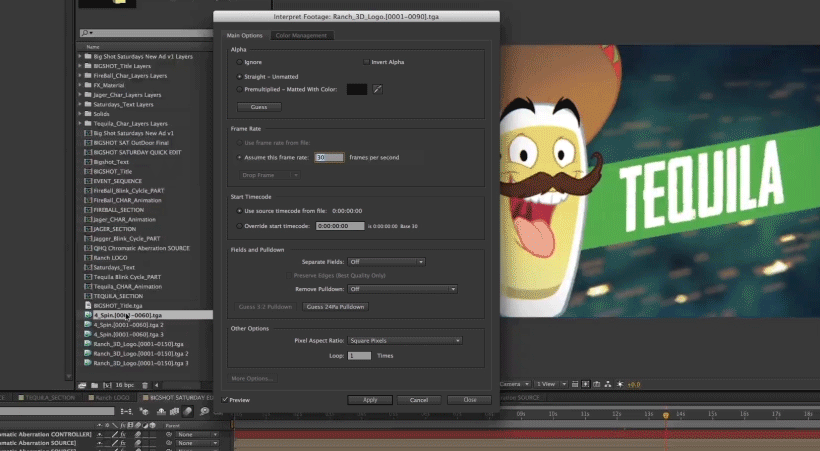
A Modeless Interpret Footage
If the interpret footage dialog were to be non-modal, you would be free to select and apply interpretation settings to more than one piece of media at a time. You could even set it the way you want, then apply the same settings to other selections. All of this could be done without even closing the dialog box.
A non-modal interpret footage window would also allow you to remove some now unnecessary elements from the menu, such as the Remember Interpretation, and apply interpretation – which are a silly way of doing things.
Expanding Modeless to Other Windows
The Interpret Footage window is not the only one that could benefit from being non-modal. Other windows could enjoy the same functionality, like the Create and Edit Solid windows. Imagine opening the Create Solid dialog and changing settings and hitting a button that will create a solid, AND leave the window open so you can create more than one with other settings.
Likewise the Edit Solid Dialog would be able to apply settings and allow you to select other solid layers and affect them without closing the dialog. Just as before, we could clean up the interface a bit. The “Affect all layers that use this solid” in the dialog could be removed, as it would no longer be needed. In fact, at this point you could probably just have the same exact dialog for create and edit.
Simple Renaming… Seriously?
I think I understand why many years ago, renaming in After Effects had to be a special interaction rather than the standard method. We are in a modern age now, and this should just change. There are no two ways about it, it needs to change.

To this day, double clicking an element in the composition or project panel opens or views the element in its own viewer panel – this behavior should be relegated to a right click. If you want the element to open into a view, right click and and choose it from the contextual menu.
Clicking or double clicking in the text area of a file should open it up for text input, just like any other application in the world today. There is no need to have renaming files set to the return key, seriously.
Zeroing Transform Values
If you are doing any kind of animation that will require you to keep track of a lot of values, you need to be able to freeze or zero out those values. It just makes much more sense when you are working with complex hierarchies such as characters and animation rigs. Having complex parent-child structures as you get in a character rig, makes it imperative to have values that will make some sort of sense as you are animating them in the graph.
As a quick example, lets say you have a box that is at an angle, it is rotated 12.3 degrees -This is its reseting state. You need to animate a rotation, but because it is part of a lager mechanical component you need to rotate it in 42 degree increments and animate that.
Right now in After Effects there are two ways to approach this. The first and most common would be to parent the object to a null and rotate the null, as this would have fresh and zero values to it in the rotation channel. The second would be to just figure out the rotation values using some math. Although the first method isn’t a difficult a solution to employ, what if you could just freeze and zero the transform values on that object and just animate it as if it were zero?
Being able to zero out transform values will allow you to create less complex rigs, that can easily be put back to the original and neutral pose before animation even happened. The ability to zero out transformations could make setting up rigs for characters and general animation much easier and views much cleaner in the graph editor.
Comp Layer View True Parent Display Toggle
While we are on the topic of character animation, it would be amazing to have the comp window toggle between layer view and hierarchy views. I think it is about time for this. More and more frequently After Effects is being tasked with complex animations tasks and it is about time it acted more like an animation friendly application.
After Effects already allows you to toggle between layer name and source names in the composition panel. I am not suggesting that those are not still useful. What I am suggesting is there should be an additional state toggle, showing only the hierarchal view of elements in the scene. So if you are doing character animation, everything is easily right in front of you and where it should be in the list.
A Parent view or hierarchy would be much more intuitive for more complex animation work. I think everyone would be familiar with the standard drop-down and indented parent child structures at this point and it wouldn’t be too much of a stretch to get everyone onboard.
Set Keyframe With One Key
In this modern age of very, very large monitors, it is really a time consuming hassle to travel all the way over to the “Add or remove keyframe at current time” area of the timeline.
There are shortcuts for creating keys for creating keyframes for specific channels and for the most part, that is fairly simple. Hitting option plus the corresponding letter for the attribute you went to key is easy, although it can get a bit tricky if you are keying multiple channels at regular intervals, which is how so many animations start out.
What if you are setting keys for all the transform channels all at once? Then it becomes a more of a challenge and requires some thought to do that – even with two hands.
What if After Effects had a “Set Key” command that would just set keys for all channels that are active for animation? This way you could just hit command+a key to set keys for all channels all at once for anything that was selected in the layer view.
Keying all Active Attributes
This could make character animation much easier, adding keys for everything at regular intervals so stray animation can’t accidentally creep up from an earlier frame, because something was not keyed way back there.
Character Sets
In fact you could take this one step further with an “Attribute Set” environment where you could drop in all the channels and attributes that you wanted to key. An attribute set is something that is commonly used in other animation applications. Maya for example will allow you to create a character set. To this you can make sub-sets and fill them all with the various attributes that you want to key.
As an example, if you have a character in your scene and you want to key a walk cycle, you could have that characters chosen key-able attributes in an attribute set, with a sub-set for the elements that will make up that character’s legs. When you are on that sub-set, only the objects comprising the characters legs will be assigned keys. All with just one “set Key” command.
This will also make it much easier to key multiple characters in the scene. You could theoretically apply keys to the character you want to animation in the scene without even selecting anything in the layers list.
Proper Nulls
This is kind of minor on my list, but still valued enough that it is worth mentioning. Null objects should be unique objects, not just displayed as empty 2d layers. A null should make at least two things instantly clear when you first set eyes on it. Firstly, that it is in fact a null, and not a layer. The second is that it should be instantly clear (without selecting it) where it’s pivot point or anchoring point is.
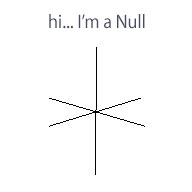
What if the nulls had the shape of a cross in After Effects? In 3D, they would look like a cross with a line through it. This would instantly show where its center of rotation is, and make it easily discernible from any other object in the view.
A true Null object would make setting up rigs that much cleaner and much more intuitive.
A Separate Mask Selection Tool or Selection “Modes”
Ever start some work, maybe editing or animation on a mask and accidentally move the layer? Ya, me too… and always. What if Ae had a tool that selected and moved masks only? This would be a really straight forward way to only affect the element that you intended.
If you want to edit or move a mask, grab the mask manipulation tool. The mask manipulation tool would not move or edit any other element in the scene. If you want to move or affect any other element, use the standard selection tool.
In fact, there may even be a case for separating the select and move tools to two separate and discreet functions respectively. A step further might also include some sort of way to filter through to what you are selecting or manipulating such as an “active” mode.
As an example, the select or move tool can be set to only affect Masks, because it is set to mask mode now. If I want to affect objects in the view, I would have to switch to object mode. In the same vein you could also filter and affect things like type, nulls, animated channels, etc.
Inconsistencies Between Object and Panel Selections
This one is more of an annoyance, and I am not sure that anything can really be done about it. There needs to be better consistency with what is selected and what can be affected.
As an example, the behaviour that happens when you have a layer selected in a composition, and then set the focus to the project panel. For all intents and purposes, the selection hasn’t been dropped – the display shows that the layer is still selected and the focus is now on the project panel. However, the Effects menu is greyed out and inactive… even though it appears you have a valid selection in the comp window.
This inconstancy continues as you can have both an element selected in the comp window and the project window without dropping either selection. There are times where it gets a bit more confusing. If you bring forward the info, preview, paragraph or any other panel, Ae acts like you have one thing in the comp window selected and the Effects menu is still active.
Graph Editor Editing
What if the Graph Editor had editable numeric fields for values? Right now there is no way to physically and accurately set a value for a keyframe in the graph editor. For example, if I want to move a key to a certain frame, I need to manually move it there. Likewise with any keyframe’s value, to edit it, you can move it in the graph, which is not that accurate, or enter the keyframe edit dialog.
If the graph editor had two editable fields across its top, one for frame, the other for value, it would make editing multiple keys much easier than selecting multiple values in the layers list.
Toggle 3D View Group
After Effects has some keys for changing a single view window’s view from top, side, etc, but it would be great to have an easy way to pop in and out of the standard 4 view mode. People do this all the time in 3D applications and I think its a commonly understood practice that it should be followed through to Ae.
It would be great to be able to hit a key and get the 4 window view, and then easily pop into the top, front, or side view, and then back to active camera, and back to the 4 window view.
[well]
Anything I Miss?
What gets under your skin about After Effects? More importantly what is your solution for it? Lets Discuss…
[/well]

Here are some that i’ve submitted feature request for, but i’ll post it hear for further discussion. I’ve got more, but i’ll start with 3 for now.
1: Presets need to remember the expansion state of the filters applied. every time you apply a new preset, everything is completely open, I wish AE would remember the state things were in the preset when I had it saved or created.
2: Calling basic effects by expressions. for example. fastBlur(20) how cool would that be, or even simpleChoker(“Final Output”, 25). Presets and expressions would be super cool with this functionality.
3: Timeline folders (I know a lot of people want this. its time to do it Adobe)
Timeline folders for sure. The Expression / effect thing is a great idea.
I really dig what you suggested with the parenting. that would be almost as good as timeline folders. Almost.
One thing that didn’t make my list (as i was looking into it further) was the ability to toggle the evaluation of all expressions on a global level. not sure if this is possible in Ae right now, but would be fantastic if it were.
Global variables, I guess with the expression effects, you would need to apply them to the layer instead of to a parameter. so, Layer expressions, this is where you would declare global variables and have global functions as well as do the expression filters.
Lately I was thinking about what bothers me the most while working in AFX and came to the conclusion that I really don’t like to alter settings in the timeline. IF you have just a few layers it is ok but as soon as the layer count goes up I find myself constantly shifting my layout around which stops me from being creative and rises my frustration level– also all the shortcuts to maximize the panel or unveiling specific attributes doesn’t help to much when you want to change rotation scale and opacity for example on 20layers at once. I would rather have a special panel next to the timeline, showing all the attributes(scale, opacity,… essentially making the transform effect a panel which controls the layers) as soon as a layer is selected. Much like the attribute panel in C4d which is also really helpful when changing the same settings for more than 1 layer. The timeline could then be used to just to shift keyframes around and act more like a dope sheet.
Of course this would change the way we work with AFX a lot but I think for the better. I have also filed a feature request for it (with a lot more smaller suggestions).
As I started using C4d more and more I noticed a lot of those small but effective workflow tools which I think AFX users could also benefit from but this one was the most important one I guess.
f2 or enter on a mac
Are you a maya user. Because all these things looked familiar to the work flow of MAYA. Anyway I support your arguments.
i am! Although most of those things are just common animation features across animation applications.
– I wish the mask expansion didn’t had an automated roundness to it. Let me change it! I need harsh angles, not round ones! Now I need to rebuild it with track mattes…
– Oh, and let me be able to select seperate vertex points of masks, so I can parent stuff to it. Just like how the puppet pins can be approached individually.
– Timeline folders as mentioned would be a game changer in terms of timeline organisation.
– Also, let me color pick a label color instead of the preselected list of colours
You only really need Cyan and Fuchsia. 🙂
Accessible vectors. Ae would get a lot more powerful if you could have access to vectors created for masks and shapes. Then you could script to them for controlling position like toComp.
Completely agree with most recommendations, especially with the Proper Nulls, character sets and proper hierarchy displays. Going over the list again, pretty much everything would be more than welcome if not an obvious addition to AE.
Duduf, the duik saint, has a zero transformation capability in his ik plugin, extremely useful. Should have been integrated into AE but he is doing adobe work for them. The recently added Ducop also addresses one of the worst annoyaces in AE for me.
Timeline folder would be my pick, if i had to pick the single most significant workflow flaw.
SetDrivenKey (maya’s) would be a welcomed addition. I guess it would be an easy tool to add, basically a Linear expression with an interface but lack the actual programming know how to pull it of. Anyone knows of someone who actually released something similar?
When I import multiple multiple image sequences in a folder, after effects doesn’t show sequences like group in nuke or fusion
Hey some nice ideas for making AE better. How about this one too.
I would like to be able to create a default startup file that goes beyond just a workspace setup. I have a template file I aways load up when starting a new project that has a custom folder structure. It would be a time saver to have that already there when I start a new project.
Lets take my simple requirements even further so that you can save whatever you want loaded in a startup file. This way when starting up after effects precomp setups with particles or motion elements are ready to go or whatever you regularly need is there. I imagine this could be implemented the way that Cinema 4d does it by just saving an AE project into the program main directory labeled startup.ae.
i could REALLY make use of that!