Dammit, We Need More Cores, Jim.
If you have ever hit render on any application, be it After Effects, Cinema 4D, Maya, or LoserPaint™®, you have probably given a bit of thought to a render farm in some capacity. Especially when faced with a looming deadline and a mountain of changes, you have probably wondered what it would be like to render to a room full of rack-mounted machines.
Simply select the number and type of CPUs you need and launch the job. ZYNC analyzes your script and uploads any required elements from your server automatically
In my mind a render farm connotes a scene with wind-kissed flowers gently swaying in a summers’ meadow while sparkles and joyful music plays in the background. However, in reality this ideal image of a huge battery of rendering cores at my disposal has always been out of reach financially, as well as scale of capacity and effort.
What is ZYNC?
ZYNC is a cloud based rendering and storage platform, that is design to be powerful, expandable, and affordable, as a pay-as-you-go system.
ZYNC is a bit of a new concept in that it is for CG artists by CG Artists. This, in itself is a huge deal actually. The ZYNC team has given you, casual or expert users alike, the ability and power to render to as many machines as you wish… easily.
There have been other and many services and attempts in the past, however in my opinion, none are as simple, easy, and as effective as the ZYNC solution. The ZYNC team has made every effort to make the ZYNC a usable experience, rather than just a service.
This is pretty clear right from the start, installing all the elements needed, to logging on and setting up the system, and follows right through to rendering. It is all dead simple and, after everything is all set up and ready to go, feels like you have a render farm in the same room with you. Actually, its a bit better than that because ZYNC uses familiar and local file paths, it is just like working on a machine that has as many processors and RAM as the job requires, and that to me is a novel and refreshing notion.
ZYNC also provides tight integration with Shotgun production tracking and management software giving you further ability to integrate ZYNC on a pipeline level, by automatically adding your assets to Shotgun and populating the entry with all the details from the render job.
How ZYNC is Set Up
ZYNC gives you the power of cloud based rendering with the simplicity of integrating with your current workflows.
ZYNC is set up to feel like nothing has changed with your system and workflow, other than with ZYNC you have the power of any size render farm at your fingertips. The ZYNC team has taken special interest in having ZYNC feel like rendering to an Amazon ec2 system that is as easy as pressing the print button from your computer, and printing to a local printer that is right next to you.
That may sound like an oversimplification, but it really isn’t. ZYNC takes care of all your files, textures, resources, references, and everything that is needed to render out your scene, for you, and ZYNC shows it all as local paths, making it seem like you are just using a machine that is in the same room with you.
When machines start to render and renders become complete, they start populating your folder on your local drive, as if it were your own machine rendering them. There is no need to transfer files manually in any direction, ZYNC takes care of that for you. ZYNC is convenient, it works, and it is competitively priced.
Who Are Behind ZYNC?
The minds behind ZYNC are Brian Drewes and Sean Devereaux, with Brian Cipriano and Todd Prives developing the fledgling in-house rendering tool into ZYNC.
ZYNC was born the result from a need. Brian Drewes and Sean Devereaux created Zero VFX, a visual effects boutique in 2010, and came up with the idea of using a cloud alternative in place of building a local render farm. Sean took up designing ZYNC with Brian Cipriano as Creative Director of Software, building ZYNC as an in-house tool.
Previous, Brian had been a successful VFX producer for both commercial and film for the last fifteen years, and Sean shared a similar background, spending ten plus years as a VFX artist and Supervisor at digital Domain, Industrial Light and Magic, Hydraulix and Asylum.
Todd Prives joined in early 2012 helping build ZYNC into a commercial software platform. Todd spent over ten years at GenArts, the a high end VFX software plug-in developer for 2D applications such as Flame, Nuke, After Effects, Avid & Final Cut Pro.
Todd mentions that is the last year ZYNC has worked closely with a host of software developers as well as third party plugin developers, working on licensing arrangements for ZYNC to be able to offer unlimited on-demand render licensed to its users.
How ZYNC Works
Right now ZYNC works with Autodesk Maya, supporting Maya software, mental ray, and V-Ray renderers, and as well as NUKE, including the same setup and ZYNC features for both of those applications. The company has plans to include the same level of support for Adobe After Effects and Maxon Cinema 4D, Modo and 3ds Max, along with all the major platforms, which will make ZYNC a one-stop solution really aimed at everyone.
Register online with ZYNC, log into your personal SYNC site which is a hub for your account, configurations, usage tracking, users, projects scripts and integration features. Then download the client applications. ZYNC requires a small client application to be running that connects to the SYNC system providing transfers in a secure SSH tunnel, generating a custom and private key for every user, or every user at your studio. Install the plugins for your host applications, Autodesk Maya or Nuke, which consist of a plugin and some scripts providing interface elements for the ZYNC system. Then You are ready to go and start using and rendering in the Cloud.
Using ZYNC
Getting started using ZYNC is entirely a dead simple process. Admittedly, I am not really inclined into understanding the internal workings of a cloud computing service, looking at the Amazon ec2, and even taking a brief look at some tutorial as to how to get Maya up and running left me feeling a little underwater.
Not that I couldn’t probably figure it all out, I could have, the point is that I couldn’t figure it out right away, it involved more depth and research on my part. This is mostly the reason why it was always left on the back burner, too busy to actually spend some time to figure it out with crucial deadlines looming, and when there is nothing to render, the motivation to SSH tunnel and figure out shell commands are pretty much non existent for me.
This is how ZYNc is really different, I spent maybe 15 minutes looking over the users guide, registering, getting my keys, and installing everything and getting it all set up. After that I was pretty confident that it would all work. It was all really painless.
Nothing really speaks to this more than Todd Prives’ example to me where in 2011 Atomic Fiction of Emeryville CA, an Alpha tester of the ZYNC system, had just set up their new Visual Effects house for business, and decided on using the cloud for rendering rather than building a render farm. The benefit to using ZYNC was clearly perceived when Atomic Fiction worked on the Robert Zemeckis film “Flight” on which Atomic Fiction were the sole VFX vendor.
The show ballooned from 120 shots to 400 shots, as shows often do, and Atomic Fiction were able to scale their render farm power easily, simply being on ZYNC.
Setting Up a ZYNC Account
Registering with ZYNC gives you a custom ZYNC site where you can login with your account. This is a custom personal ZYNC site, displaying the ZYNC web console component to the system. Upon registration you are given the URL to your unique ZYNC site, and some links for host application scripts, and the ZYNC client app which needs to be running to communicate with the ZYNC web console.

The ZYNC Web Console
The Web Console for ZYNC, is the hub where you can manage all aspects of your ZYNC account. This includes everything from launching and monitoring jobs, keeping track of your usage and spend amounts, adding and managing users for the account, right down to keeping track of projects that have been rendered or in the cue, allowing you to browse through project files, and manage scripts or Shotgun integration.
The ZYNC Client Application
The ZYNC Client app is necessary for communicating with the ZYNC system and providing a strong and secure transfer of files and information when using the ZYNC system. The SYNC Client application can be downloaded for most all configuations including Mac OS, Linux, and Windows systems.
Using a Secure SSH Tunnel, ZYNC transfers data to and from your stations by way of a private key that can be generated with the SYNC Client application. If you are at a studio, only an administrator can generate security keys, and every time there is a key generated, the administrator is notified via email.
If the ZYNC Client application is not running, you are still able to log into the ZYNC Web console and perform administrative tasks, however, you will not be able to launch any jobs to the ZYNV system.
The ZYNC Host Application Installation
After you have registered, and installed the ZYNC client application and set that up, you need to install the host application plugins so you are able to render directly to ZYNC by hitting a button and without leaving your work.
At the moment, there are only plugins for Autodesk Maya, and the Foundry’s Nuke. Installation is simple through a guided installer, asking for your ZYNC user name and passwords, and will allow you to “get an API Key” which will automatically link your ZYNC home site / Web Console with your version of Maya or Nuke.
The installer will detect and present the locations for the installation files, which you can change before actually doing the install, If you have multiple versions of Maya on your machine, the installer will allow you to choose from a list of installed versions to install ZYNC into.
In all, I found the installation process to be really simple and painless while using the ZYNC user guide, which was really simple to follow along with, and answered all of my questions.
Once the installation s complete, you are presented with a new Maya Shelf labeled ZYNC that houses the ZYNC button that will let you render jobs to the ZYNC system.
Rendering with ZYNC
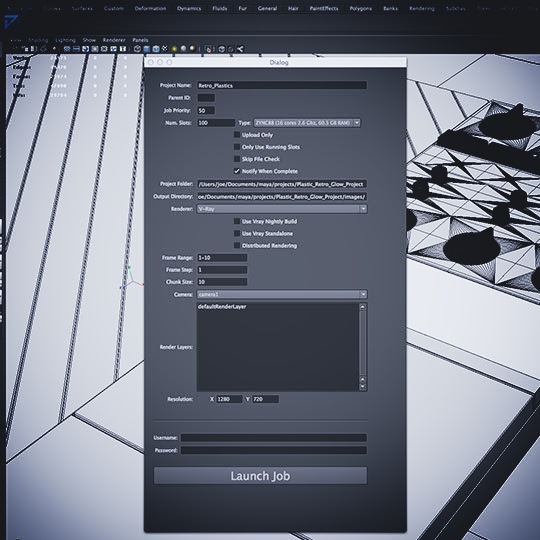
Pressing the ZYNC shelf button in Maya will show a dialog box not dissimilar to a print dialog box, where you can set the details for your render job.
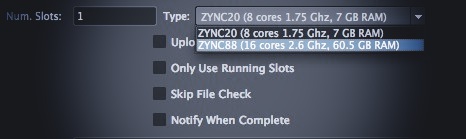
If you have ever used a render manager applicant, this will seem a bit familiar. Here you can select a project name that will be used for the files in the cloud, set a job priority for the render, and choose the machine type to render to, and how many of those machines you would like.
ZYNC offers two machine types, the ZYNC20 offering 8 ? 1.75 Ghz cores with 7 GB or RAM, and the beefier ZYNC88 with 16 ? 2.6 Ghz cores with 60.5 GB of RAM.
With the ZYNC dialog in Maya, you are also able to set the job’s type, either as an actual render, or merely as an “upload only”. The idea, is that either way, ZYNC will collect and upload all of the assets needed for the render job; That is to say all the textures, models and anything you are using in that maya scene file including all the references, cache files, scripts, etc. – What a huge time savings, and worry-free workflow.
In fact if you have uploaded your scene once, every time you render from that point on, ZYNC will check and only upload files that have changed before rendering.
ZYNC uses local file paths, using the cloud paths behind the scenes, so for all intents and purposes, ZYNC works like you are sitting at your desk accessing local machines. ZYNC will automatically read your Maya Project folder and set that in the proper location in the ZYNC dialog, and also the proper Output Directory.
You have the choice to render with V-Ray or Mental Ray, and even the option to use the V-Ray nightly build for rendering, or V-ray StandAlone, and V-Ray Distributed Rendering if you would like to share a single frame across multiple processors instead of animated frames.
The ZYNC Render Dialog will conveniently read the Maya scene’s cameras, and any render layers that are in the scene, allowing you to choose which layers, or which multiple render layers you want to render for that job.

Once you launch a job from the ZYNC render dialog in Maya, you are able to monitor the jobs process through the ZYNC web console. You can watch as ZYNC will build all the machines needed, install the OS, Maya, and the render for each machine, and then render – Its an exciting flurry of progress bars.
Once renders become complete, they get transferred over to your local Maya project Images folder (or wherever you designated other than this default). There is no need to transfer files over, or manage anything else. If you want to check up on the progress of your renders, you can actually see rendered thumbnails of jobs in the ZYNC web console, which is useful to check and make sure that the renders are in fact correct and not missing something that you forgot to check before render.
Conclusions
Please keep in mind that I am not affiliated in any way with ZYNC, and this is not a paid advertisement. Having said that, I found the entire ZYNC system and process to be exemplary, being everything that I personally would look for in a cloud rendering solution. If you have no experience or time to set up your own Amazon ec2 rendering solution, ZYNC is for you. If you do have experience with setting up a cloud rendering solution, ZYNC still makes sense.
It might be crucial to get other applications rendering to the ZYNC system, including ZYNC integration in After Effects, Cinema 4D, 3ds, etc. With these in place, I can foresee ZYNC being might be accepted as the “Standard” in cloud rendering solutions.


An other option is RevUp Render http://www.revuprender.com
With RevUp Render you can render in the cloud with any 3D application. RevUp Render is the original cloud render solution!
I am really curious how the pricing works for these cloud based solutions. Any word on that?
I was rendering on 10 – 16 core machines for around 5 hours, and it was pretty reasonable (less than 300$). Not something that you would do on your own as a hobbyist, but definitely easy enough to work into client quotes. They are working on their pricing before the release.