The Importance of Interpolation
Adding keyframes is only part of the equation. As artists, we can’t leave important decisions to the tool we happen to be using at the time. One such important decision is how the keyframes are being interpolated. Animation is all about timing and spacing, and directing the spacing is just as important as directing the timing.
[pullquote align=”right” background=”on”]…Ae’s modal windows are a workflow killer[/pullquote]Animators will have their own personal preference as to interpolation defaults. If you after working on the timing of your animation, most prefer stepped, pop-through, or none. If you are just making simple, quick and dirty motion, animators like to have a spline that makes some nice base-eases. After Effects default interpolation method is linear.
Jumping Around Interpolation Settings
The thing is, while working, you will usually bounce between various keyframe /graph interpolation methods. You might start out stepped, and then change to curves, then maybe adjust those curves, and move to linear.
After Effects has a few simple “ease” setting that you can get to easily, under the keyframe assistant contextual menu, and that is helpful.
The thing is, it is really hard to bounce around to different keyframe interpolation settings. Making matters worse, is that the dialog where you can change all that is modal, meaning you need to dismiss it when you want to do anything else with the application. I’ve mentioned more than a few times how Ae’s modal windows are a workflow killer.
Keyframe Interpolation, Moho Makes it Ease-y
Silly puns aside, Moho makes it really simple to move from all the interpolation settings. There is a clear and easily accessible pull down menu that can change the default interpolation method, right on the timeline. Creating keys will use the interpolation method that is chosen in the dropdown. Make a few linear, make a few curved, make a few stepped.
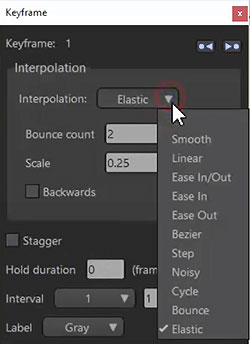
Moho also has a contextual menu that handles keyframe interpolation like Ae does, but is more in there. Like, a lot more. If you are familiar with Flash, this feels quite similar. You can easily choose between ease presets, bezier, step, stagger, hold, noisy, cycle, bounce elastic, and more.
What’s more, is that choosing one, will bring up a non-modal dialog. This lets you choose keyframes, and then change the settings in the panel for those keyframes.
Moho also reads the last keyframe as the end of the animation, no matter what the interpolation setting is. This differs from After Effects, if you create expressions, or use scripts that affect interpolation. Often, it is difficult to know when the animation will actually stop, as it often will go on beyond the last keyframe.
Better Workflow for Animators
Watching Chuck DeGroot walk through easing features in Moho, really makes it clear that the application has a real focus on workflow and ease-of-use for animators.
Certainly, there are third party tools available for After Effects that try to help in this area, Chuck mentions Mt. Mograph’s Motion 2. Since the recording of chuck’s tutorial, Flow for After Effects was release, making it easier. Still, features for basic animation really to be internalized in After Effects.
[well]Visit Smith Micro to have a look at what Moho has to offer After Effects users[/well]