Bringing a Classic Sci-fi Painting to Life in 3D.
Project, Modeling, Lighting Texturing, Animation: Lester Banks
Music, Audio/Foley: Joe Basile – The Chicken Sound
Special Thanks to: Andrew Samuel Embury
[dropcap color=”#009fc7″]A[/dropcap]rguably there lived an apparent golden age of sci-fi artwork, and for me, that was the ’70s and ’80s. The ’70s represented this weird mix of science fiction and fantasy, some trippy, mind-blowing themes. In contrast, the ’80s ushered more of a slick technological gloss as an aesthetic. Both eras sparked a younger me’s imagination as much of the work that enamored me raised way more questions than they answered. I used to stare at some artwork for hours.
The Sleek Ship Emerges.
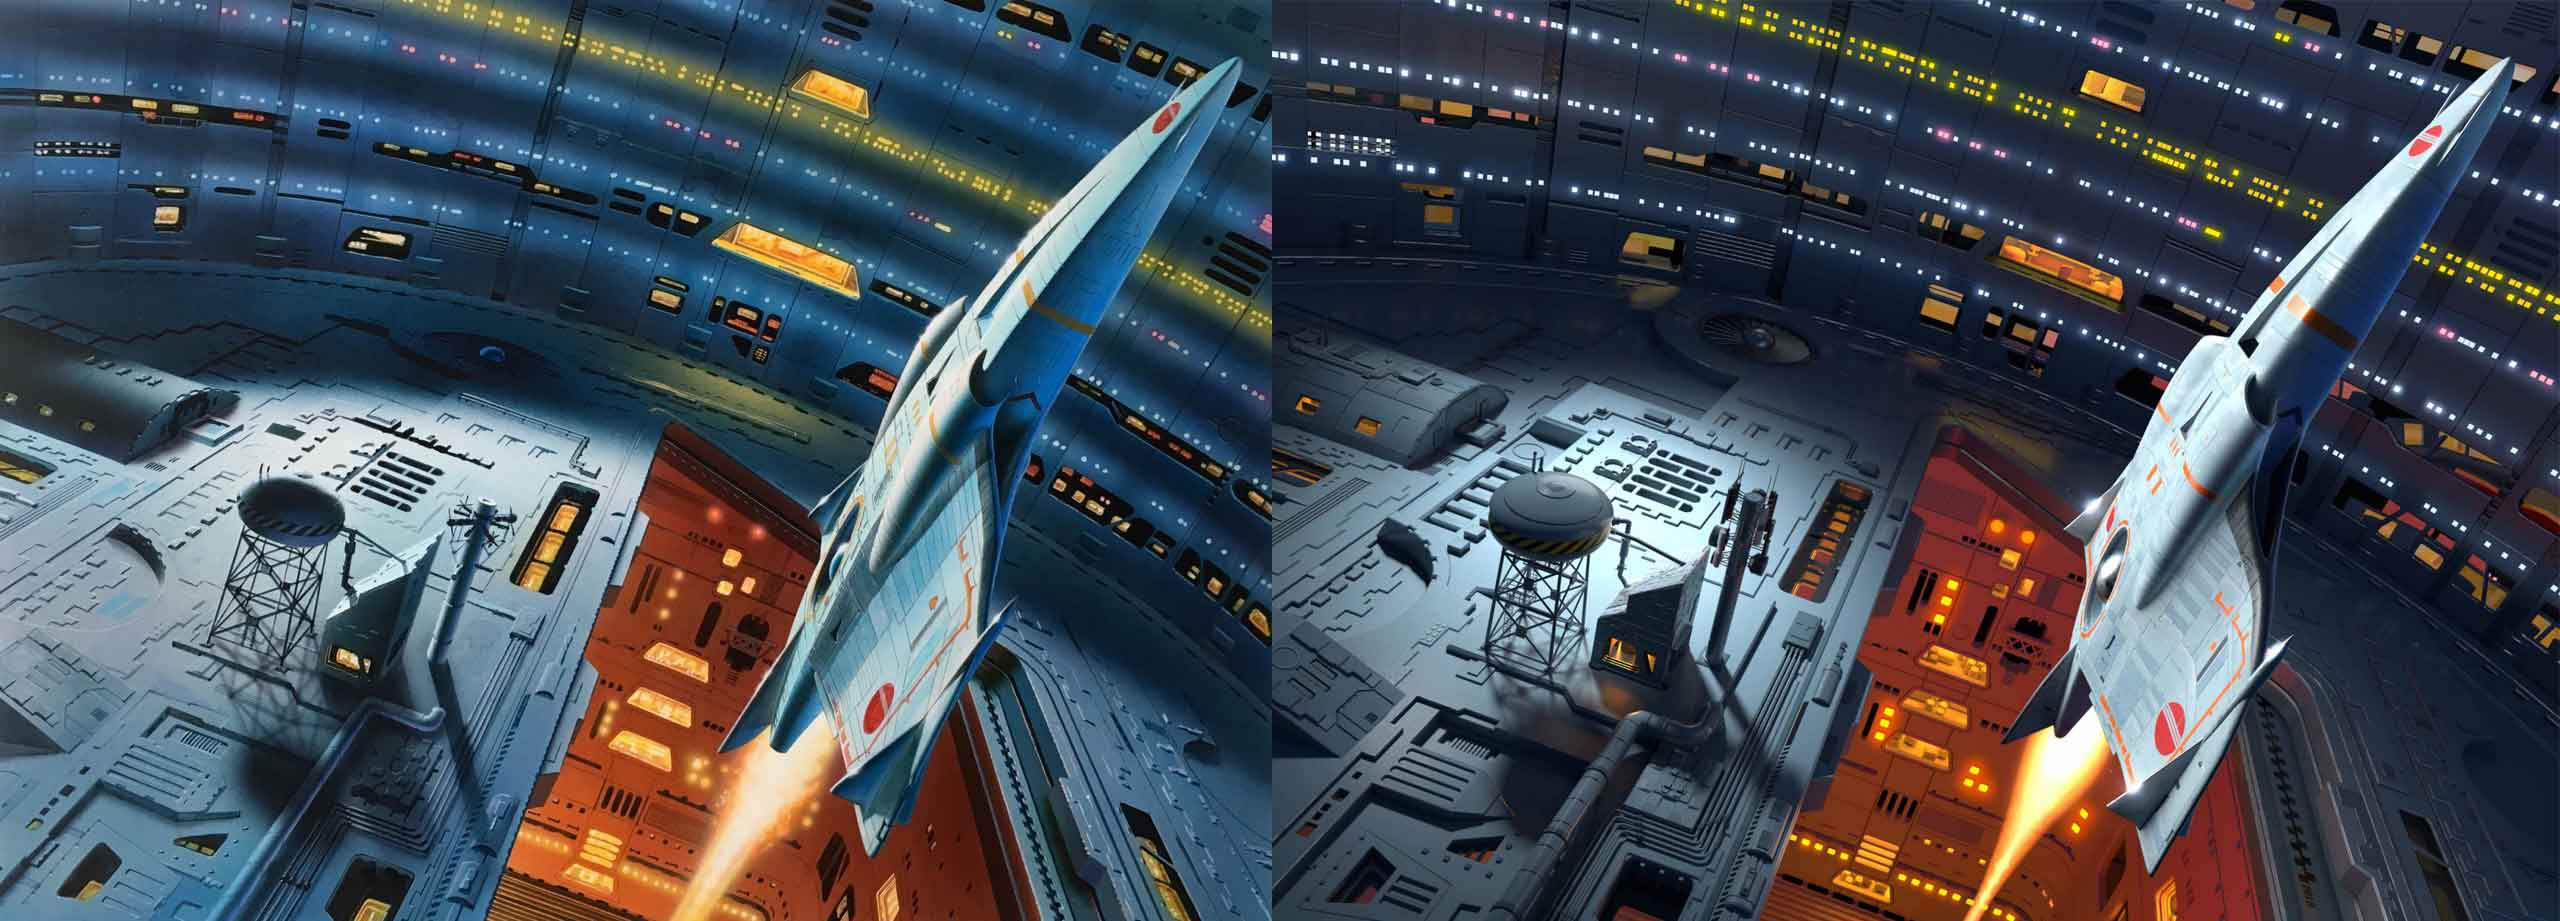
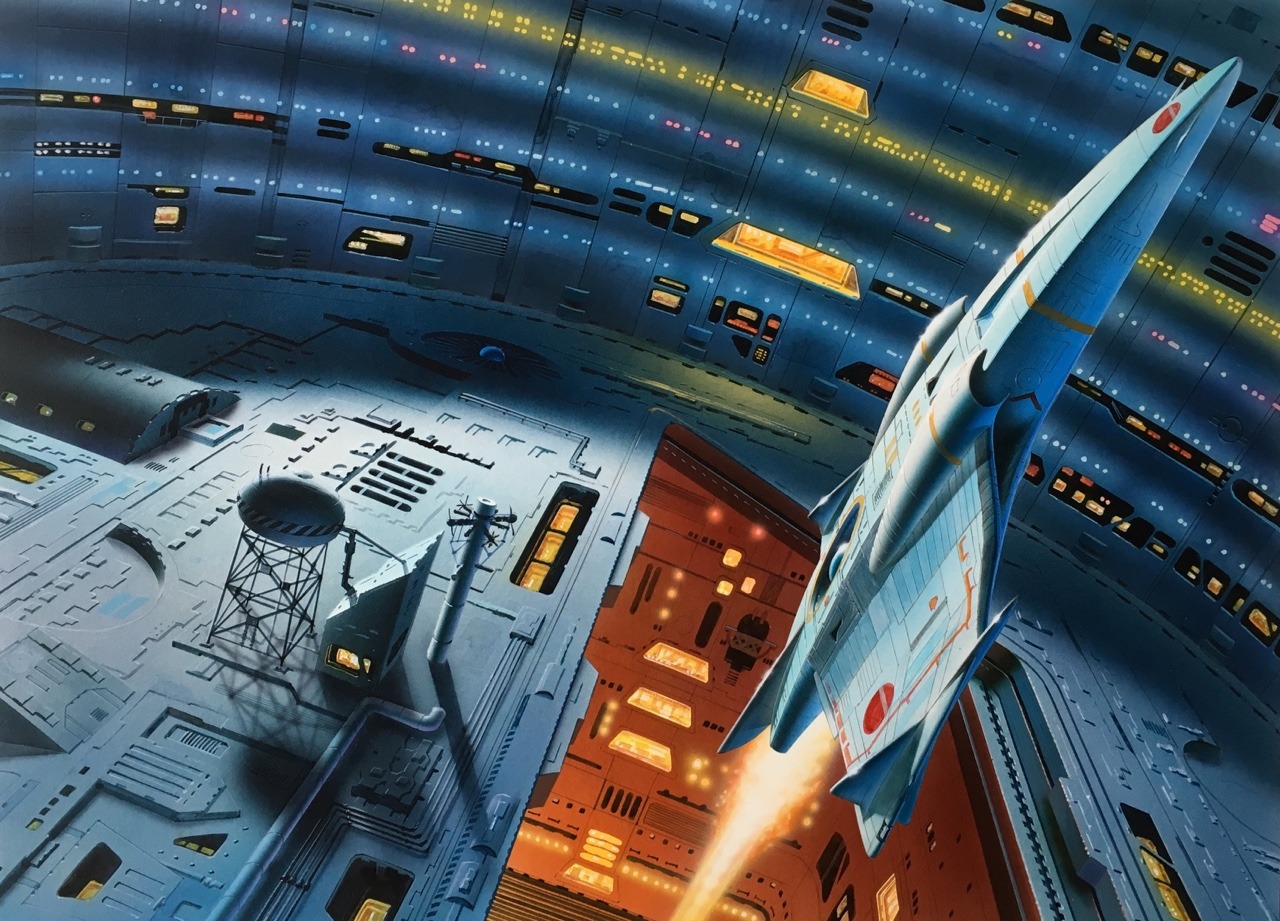
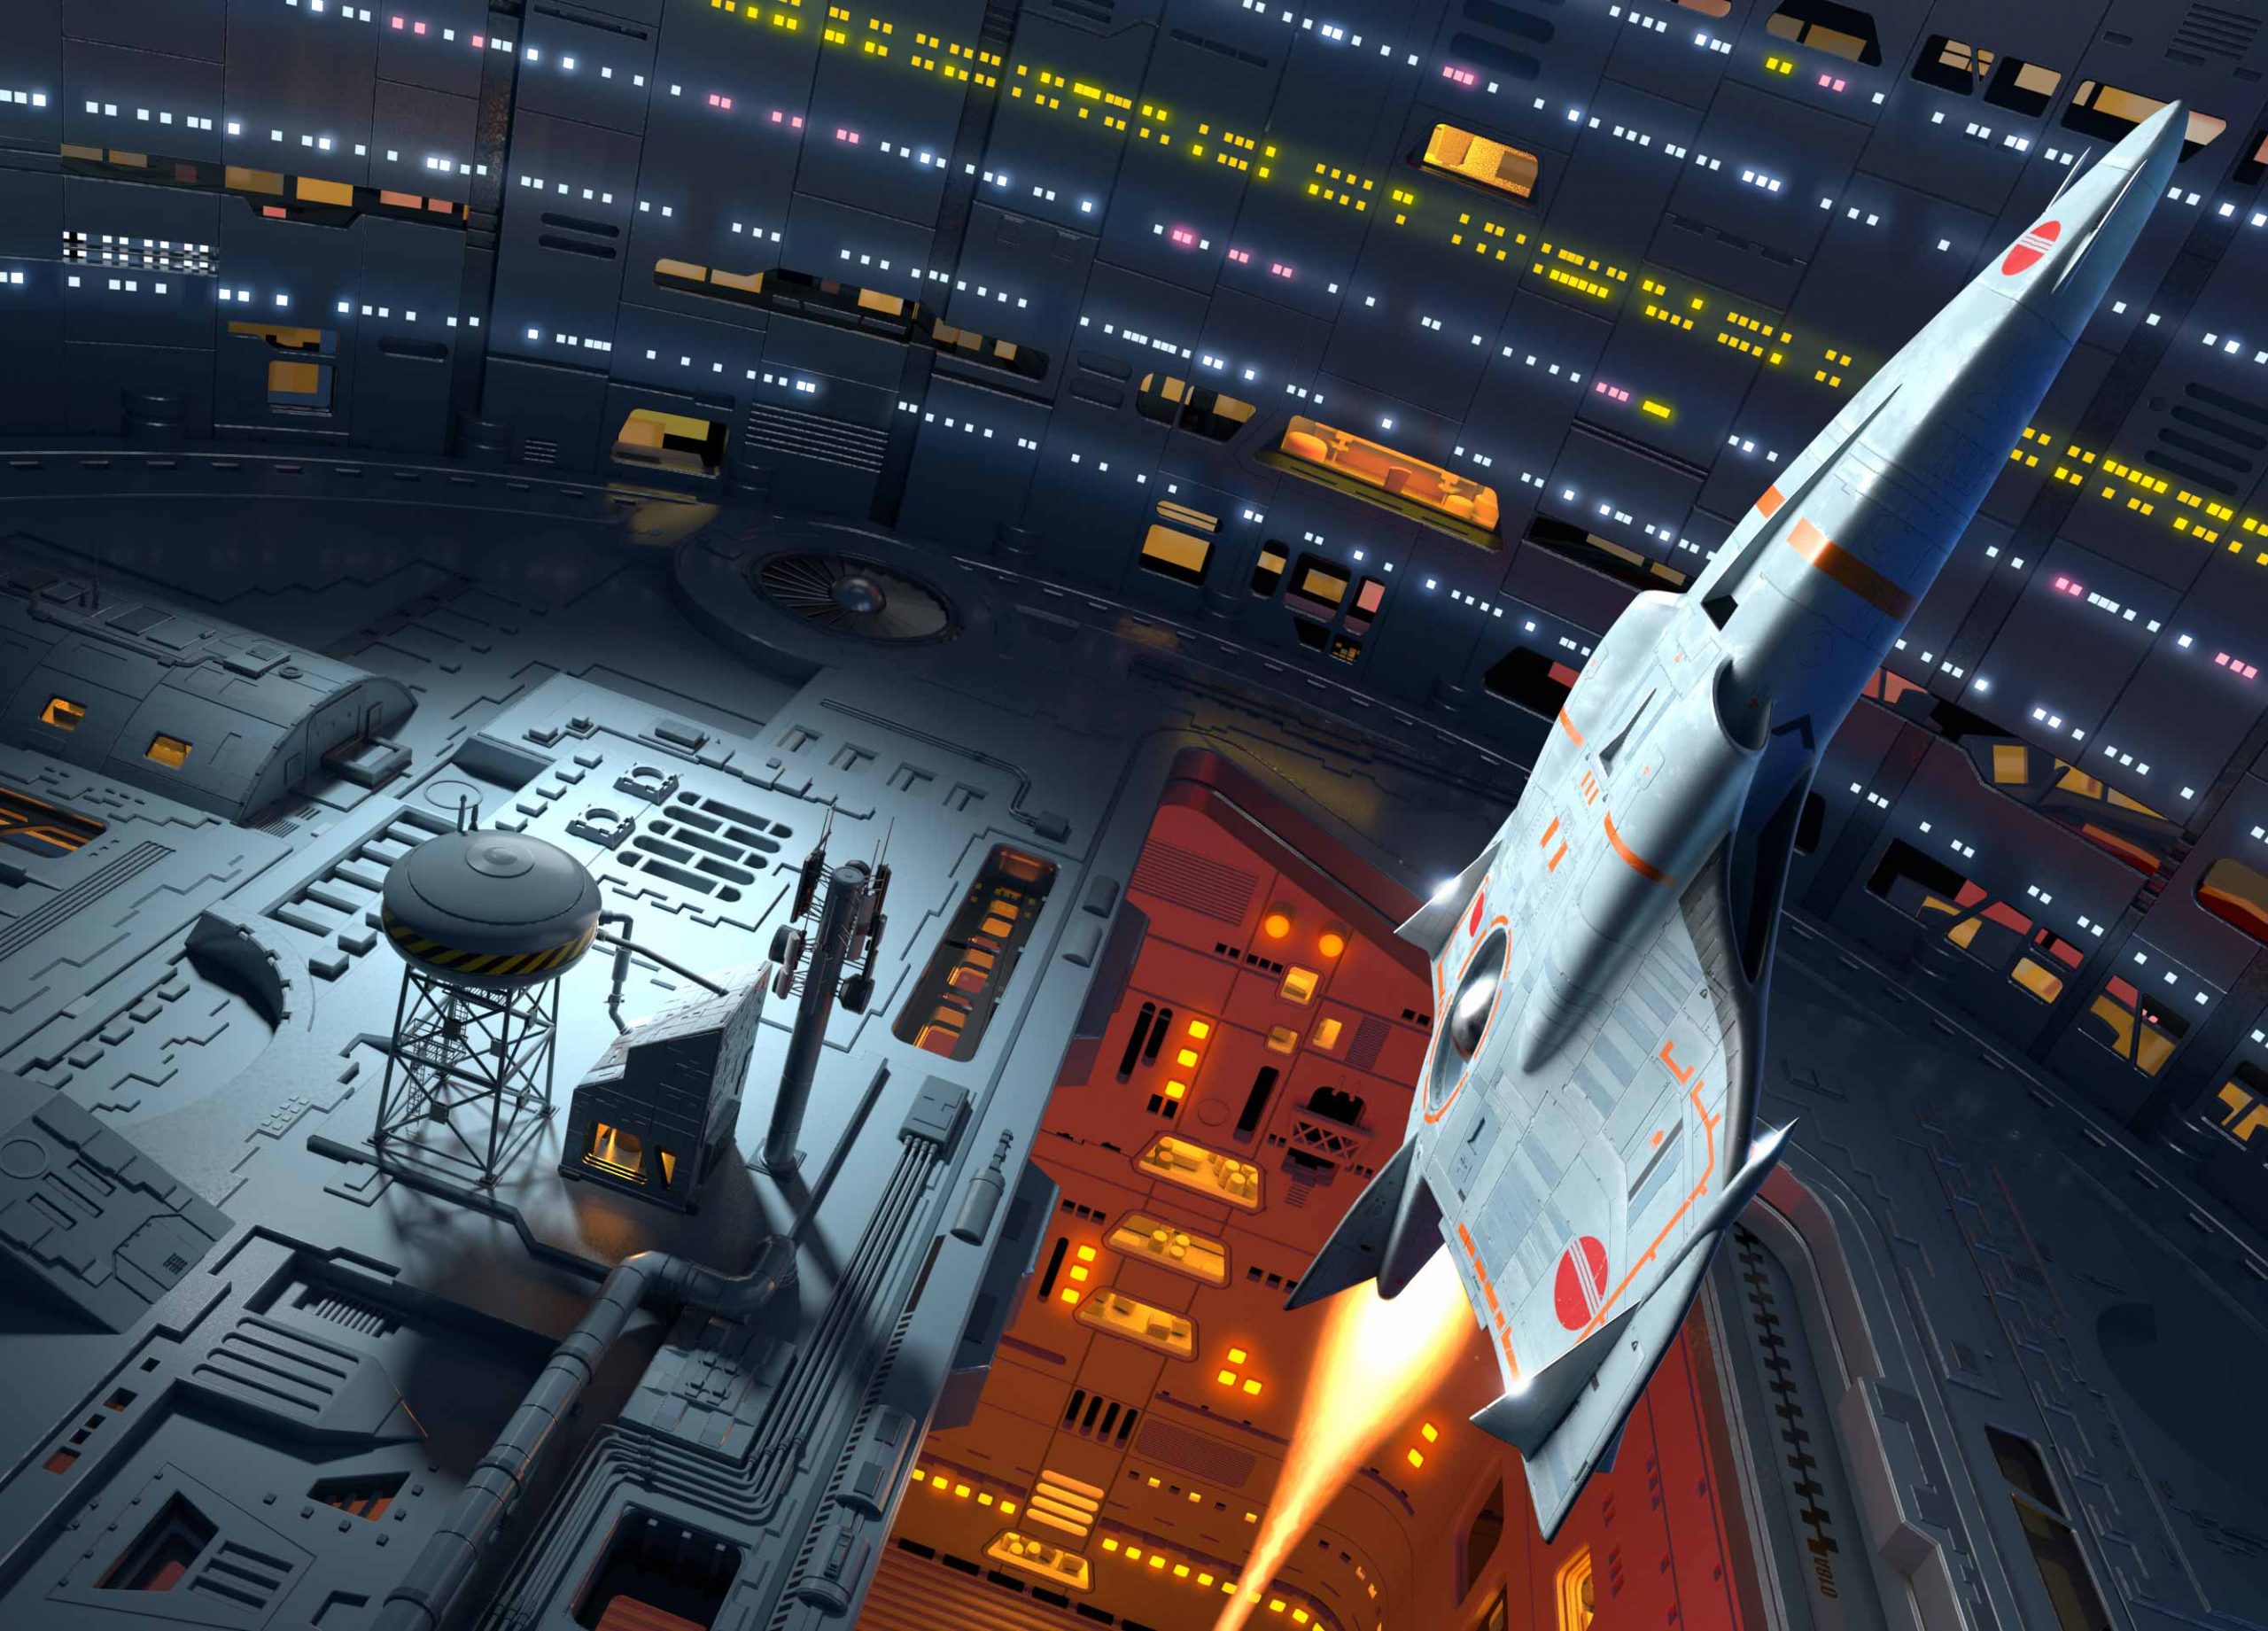
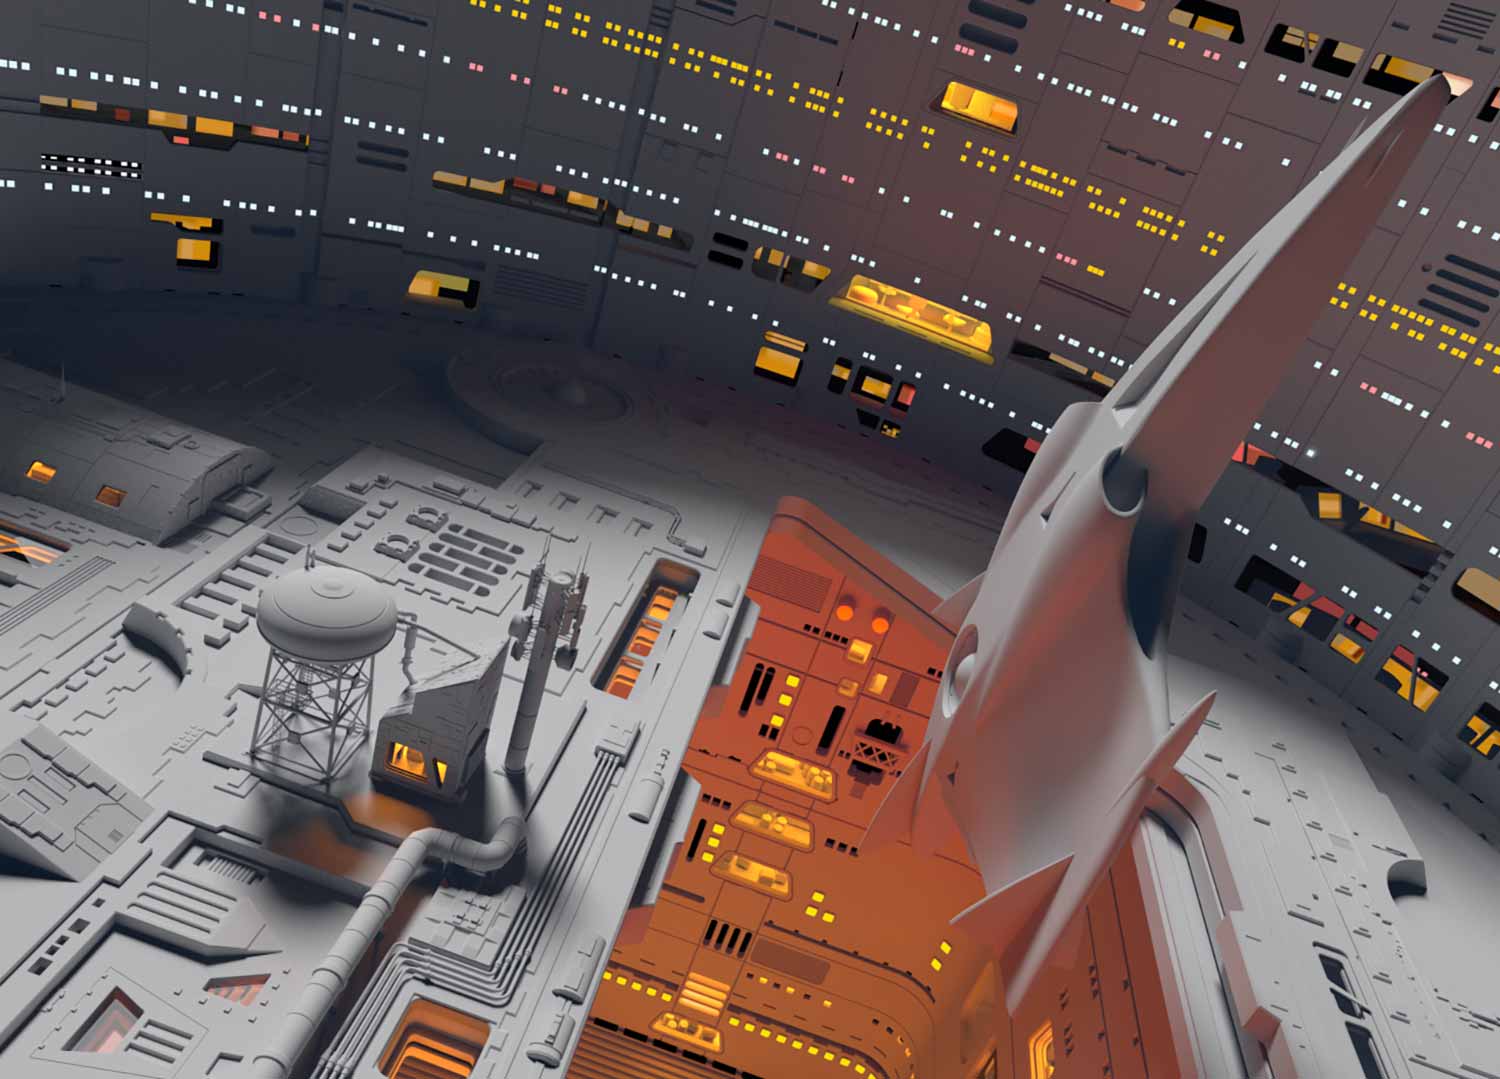
A piece that straddled both those aesthetics for me is a painting by illustrator Chris Moore, called “Star Riggers Way”—created in 1980 for a series of science fiction books by Jeffrey A. Carver. It has that distinctive rich quality of the ’70s where a single frame could tell an entire story, and it also had that slick, shiny robotic look that would define the ’80s-the perfect bridge. I wasn’t familiar with Moore’s Star Riggers Way until recently, but I did stare at it for hours, just as I used to those incredible images when I was a kid.
Inspiration and 3D.
There are plenty of great inspirational resources out there, especially if you are a sci-fi lover. Instagram is a great place to install a charge of inspiration. I happened on “Star Riggers Way” from a post by scifi_art, who shared the image shortly after becoming the new owner of the original. Attracted to the painting, fascinated by the detail, colors, the ship, and the story the image told, I snatched it dropping it into my reference directory, promising that I would one day transpose it, as close as I could, into 3D.
A Study in Form.
I did stare at the image for hours. Even before I started to lay down a single polygon, thinking how each part of the picture could work in 3D and how parts could fit together in the overall scene. You can get away with quite a bit in a 2D painting that would not translate into 3D space: for example, some of the flooring’s raised platforms appeared to melt into another level. Shadows obscured other parts of the painting.
Features That Fell Into Place.
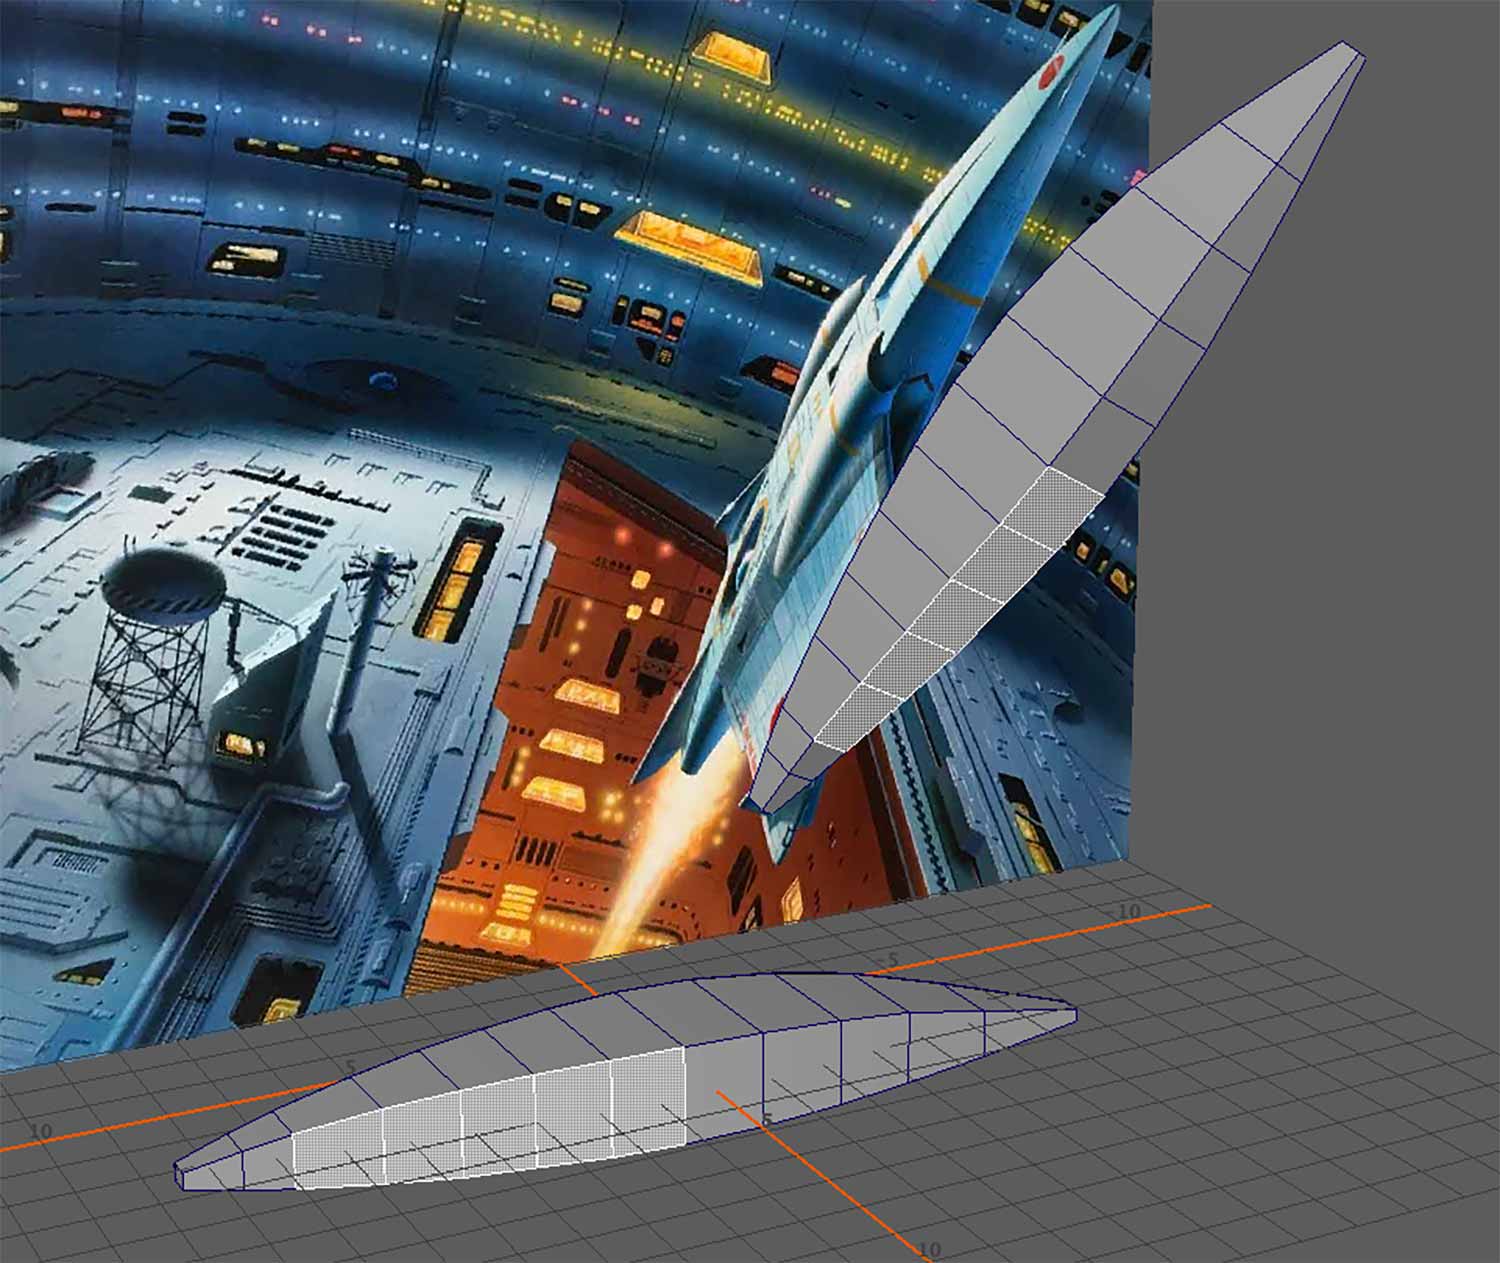
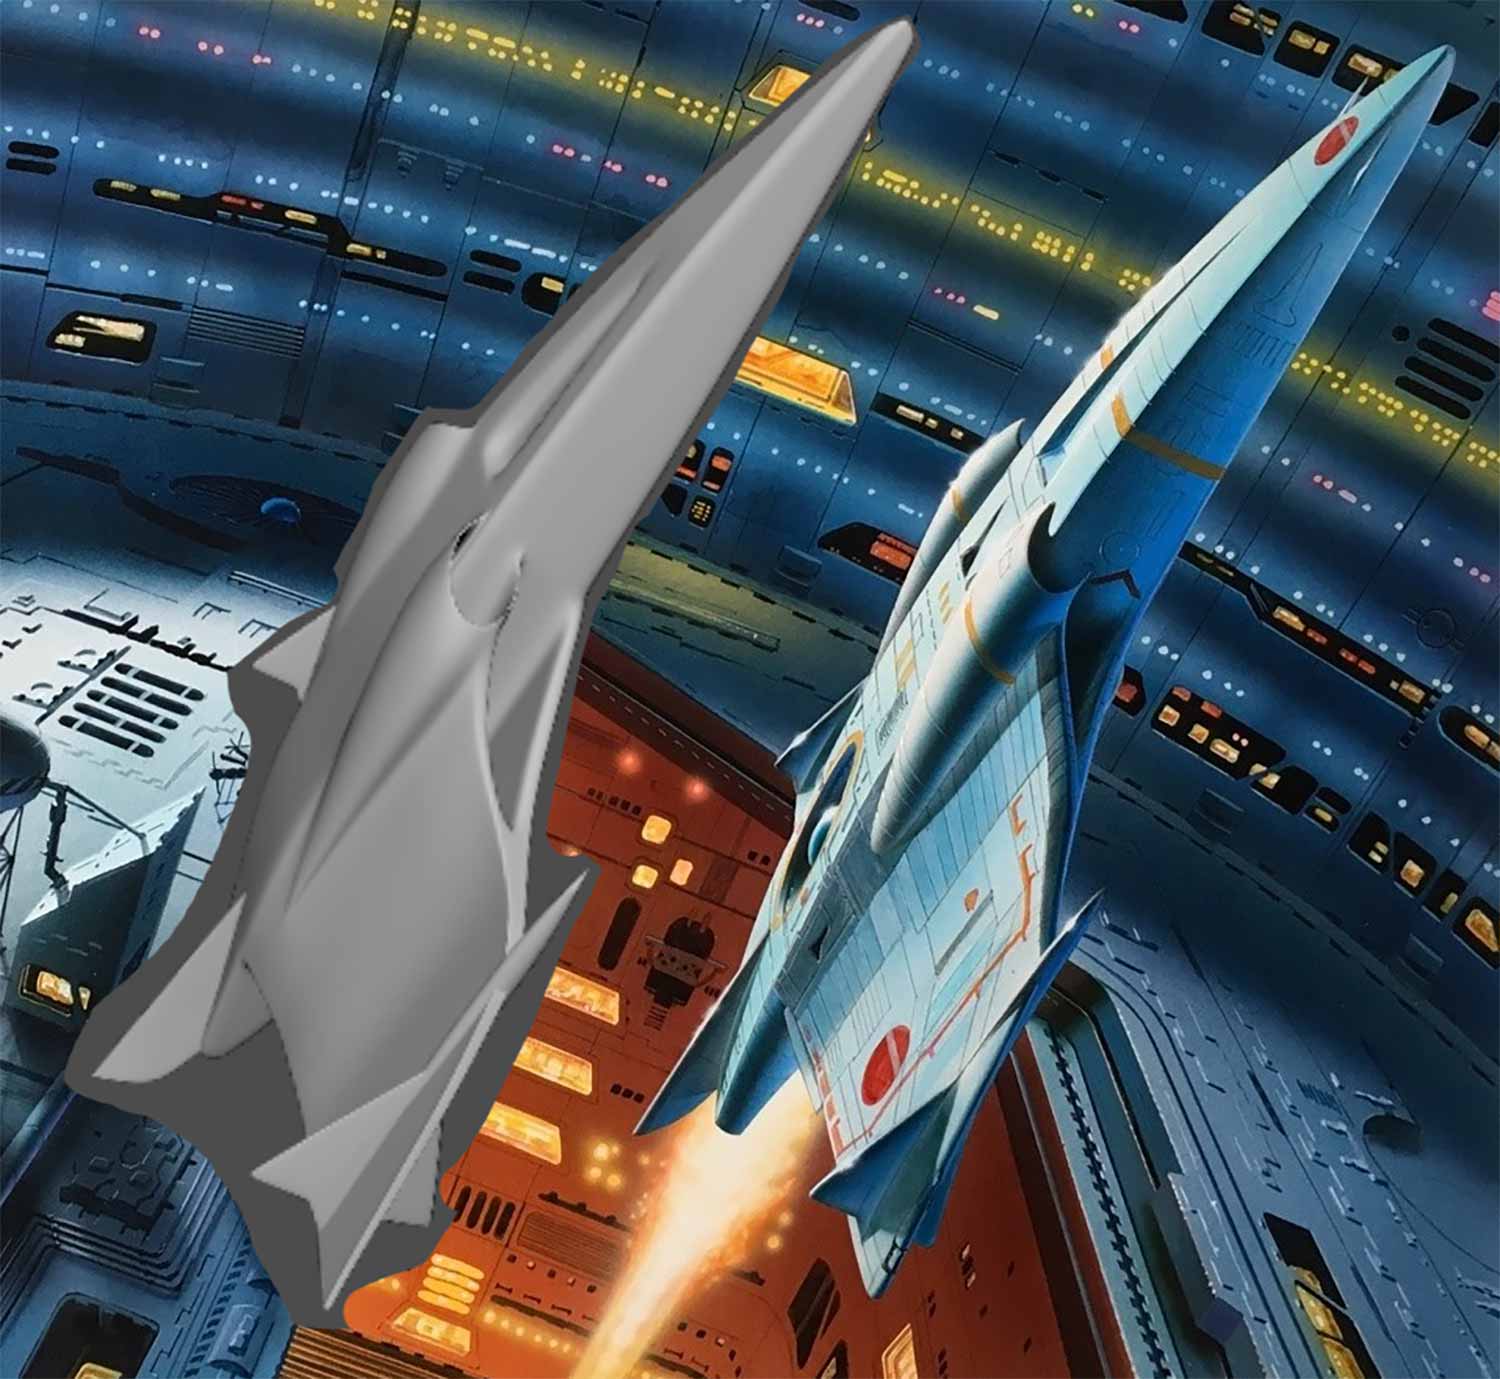
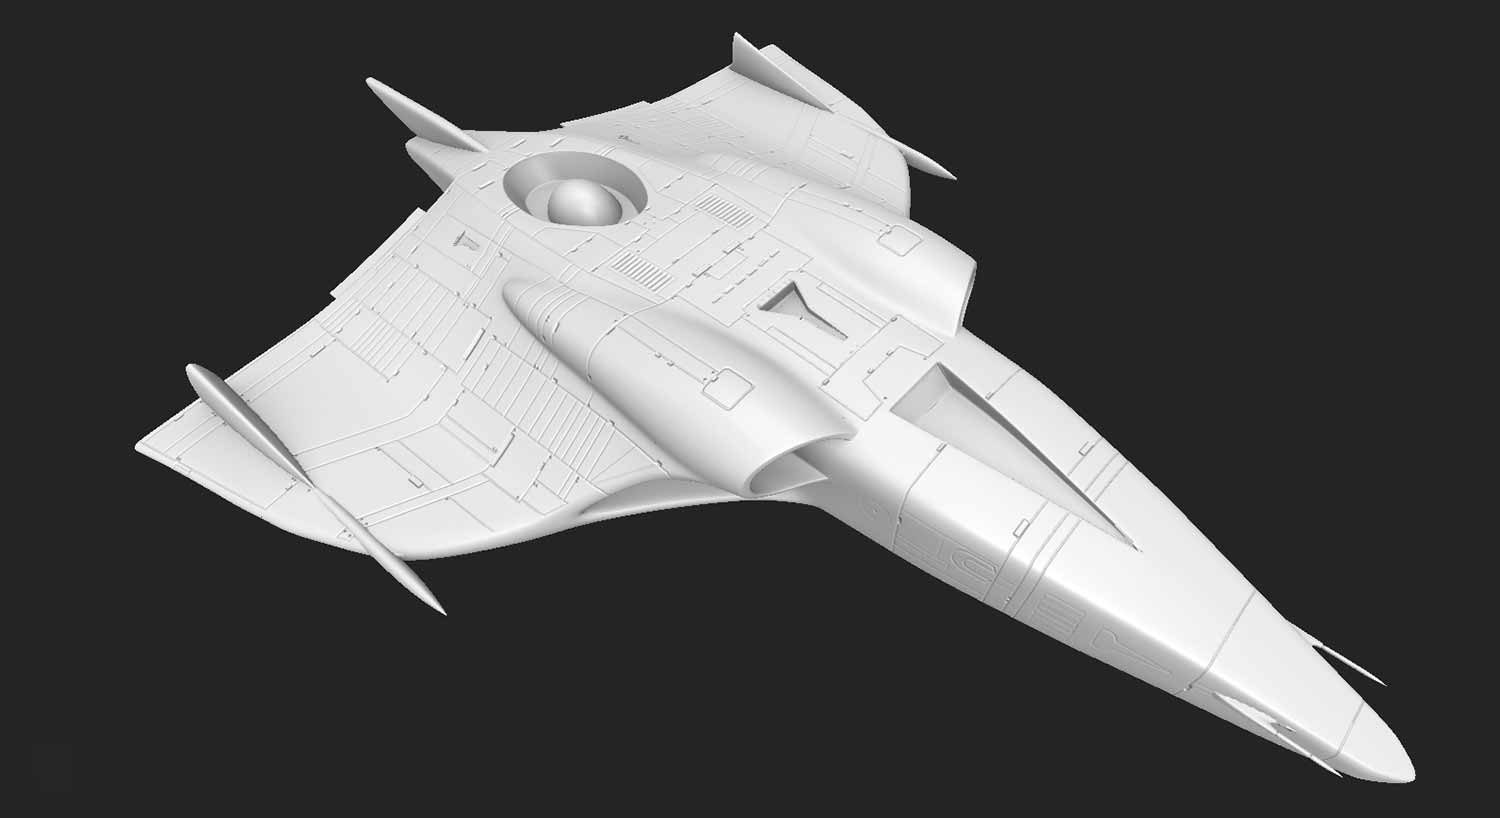
The first thing I worked on was to model one of the original pieces’ focal points: the spaceship. It took a few tries to rework the form and the topology. While it’s good practice to make sure that everything fits right, I didn’t have orthographic views of the spaceship. I tried to make most of my adjustments while the craft’s topology was still low, but I inevitably had to make wholesale changes once I saw the ship in the context of my 3D scene.
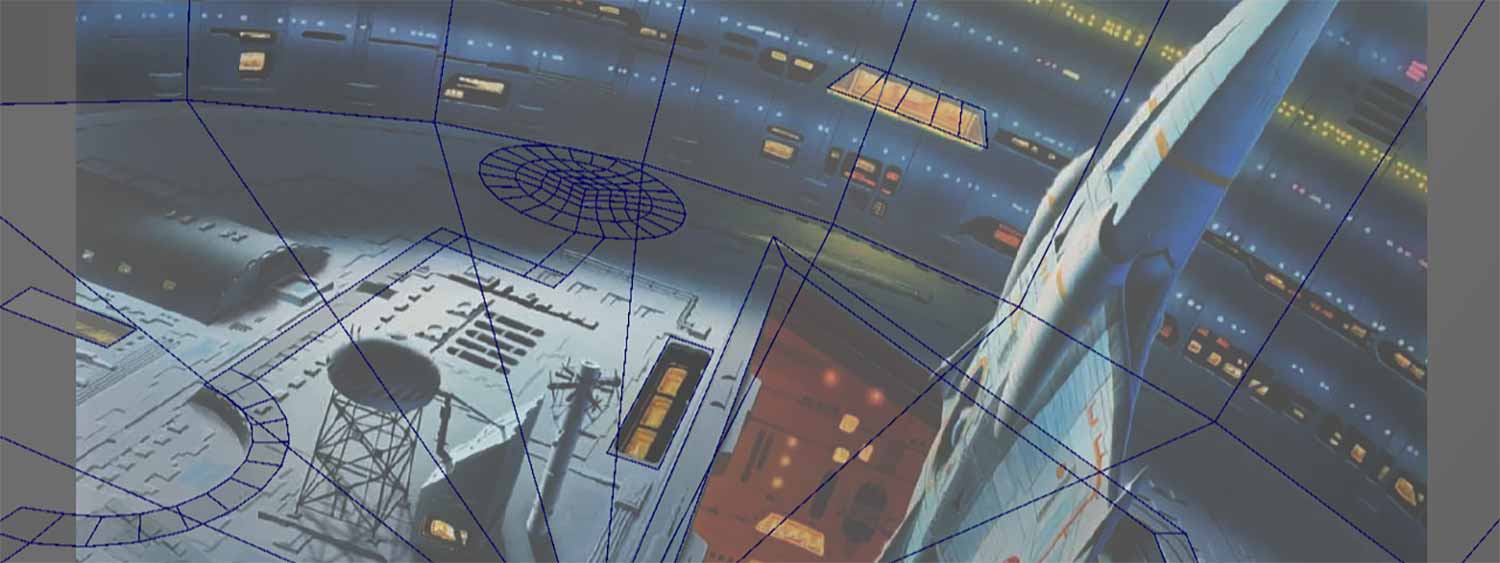
How is Everything Fitting to the Template?
It wasn’t until I moved on to modeling the rest of the scene, the station hangar bay, that I realized how much my 3D elements fit the original artwork’s perspective. Once I had reference markers for the scene’s significant features, it seemed uncanny how well things fell into place — a testament to illustrators’ skill working with their hands instead of a mouse. I understand drawing in perspective, using pen and paper, rulers and guides, because I’ve done it many times in drawing class. One of the things I recall most clearly is how much room perspective work needed. It was a lot of planning, large rulers, and a bit of skill.
The more I worked on my 3D scene, the more impressive Chris Moore’s illustration became. It even seemed like Moore added in lens distortion around the edges of the painting, perhaps mechanically somehow, or maybe intuitively. Mostly, all the components modeled fit the 3D camera’s lens against the template well, except for the original scene’s edges and the circle elements in the ship and on the station’s floor. I unavoidably had to “fudge” the shapes that I interpreted as circles in the spaceship (the recessed vertical fan at the back) to match more accurately by having it as an oval.
The Lighting Might Pose a Problem.
I thought that I would have to make many concessions in my 3D scene when adding lights. From experience, I knew that in no way would I match the lighting of the original painting by having only one light source, the way that the original implies. That ended up being true, but there was another surprise once I started adding the lights: All the shadows and reflections naturally matched the painting.
A Small Interview With Chris Moore.
I contacted Chris Moore, and he was gracious enough to answer a few questions about his work on Star Riggers Way.
Can you explain a bit about how book covers like this one get commissioned?
Well, I was quite well known by this time, and the work just kept coming in. I was originally commissioned by Peter Bennett at Methuen (Magnum Paperbacks) in around 1973 for whom myself and Mick Morris (my ex RCA business partner and a graphic designer) had done quite a few mass market covers for.
Peter wanted to try me on some SF work. I did 2 or 3, which were not good at all, but at that time the publishers decided to do wrap around covers which were landscape format not portrait.. and I was off, took to it like a duck to water.
The reputation grew quite quickly, and I found I was being approached by other publishers as well. It was a very significant aspect to our partnership that we were ideas people who could solve problems and suggest cover ideas.
We were also easy people to work with and no issues like egos to deal with… so we were always busy. I would have up to 25 covers to do at any one time.
You create two covers for Star Riggers Way, but I could only find one as a book – Was this one ever used as a printed cover?
As far as I know, it was, but without going through all my old workbooks, I can’t remember who published it, at that time, I didn’t always get cover proofs, so it might have slipped through the net. I do remember seeing a cover proof, though.
What were some of the processes and considerations behind the design before the painting began? (process, thumbnails, color studies, etc.).
I would always start with a sketch in pencil, which would get faxed over to the art director who may make suggestions but not often, they usually said, “just leave me room for the type.”
It was pretty much up to me what I did. The other work we did, the concept work, Mick and I worked on together, brainstorming ideas to get a cover design. SF was maybe 25% of our output at that time.
Do you remember what you might have used as references?
I didn’t really use reference for the SF stuff as it didn’t really exist, but I did create some covers that had recognizable features, so I would have books of the subject as a resource. I had an idea to produce covers that were views of around our world with futuristic buildings or spaceships in them, and I did a few. Others had bits of landscape that I pinched for say, a foreground or some mountains or stuff like that from magazines or picture books.
What can you tell us about constructing the perspective?
I learned to draw, so it was all constructed to work visually, sometimes I would take a view of a landscape and adapt it in some way to make it alien or different. Generally, if it looked right, it was right.
One thing that stood out is that in my 3D recreation, the shadows landed pretty much exactly where they did in your painting. How do you design the light and shadows? Is that a mechanical construction like perspective?
I always had a strong sense of where the shadows would fall and how light would affect the colours and highlights. That way, your images are more convincing.
I love how sleek and gestural the ship is, and that’s something that I wished I could carry through to the 3D rendering. Did you have any design considerations for the spaceship?
At that time spaceships had to be streamlined to pass through the atmosphere and I always figured that there had to be windows near the front so the pilot could see where he was going.
There were engines for the thrust and intakes for those engines, and weird graphics for the decals, ariels, and general clutter on the fuselage all helped. I always liked the idea of a downward-facing fan, which would enable the craft to hover or maneuver, it depended on how I felt on the day!
Do you remember any workflow tricks you had for a painting like this?
I always worked in the same way: twice up from the actual cover size. The rough would be done actual size to the cover, once approved I would enlarge the image on tracing paper either on a grant projector, which you won’t know about or later I had a photocopier which would take A3 tracing paper sheets.
Then I traced down the enlarged image onto board, mostly line board (I bought a huge supply of Crescent Hi-line board from a discontinuing supplier for peanuts, enough to last me for years.) Then I would adjust the image by redrawing it and making sure it worked.
Once drawn out, I used a frisket to mask the whole area and start possibly with the background as it’s better to try to fit your main object into the background rather than the other way around. Later I economized by using smaller bits of frisket and layout paper to mask the rest out.
The colour is applied using a brush and airbrush or whatever came to hand. Usually, an airbrush was a way of “pulling the whole thing together.”
How were things like art direction and changes handled back then?
The art director needed to make the changes at the drawing stage. Changes were rare.
If they were required then you could use patches of line paper stuck over the offending bit and redone, but I only did that once or twice at the most.
Nowadays, it’s completely different with computers! Change everything at the press of a button… sad!
About Chris Moore.
Chris Moore is a master of hi-tech, hi-sheen science fiction illustration. Moore, born in Rotherham, South Yorkshire, in 1947, says that he always wanted to be a commercial artist. He attended Doncaster Art School in pursuit of that goal.
Moore also attended Maidstone College of Art on a Graphic Design the years between 1966 and 1969 and later accepted by the Royal College of Art to study illustration between 1969 and 1972.
Moore worked on titles by Isaac Asimov, Larry Niven, Frederick Pohl, Anne McCaffrey, Clifford D. Simak, Kurt Vonnegut, J.G. Ballard, Arthur C. Clarke, and Samuel R. Delany. Moore was also the artist of choice for more mainstream writers like Jeffery Archer, Frederick Forsyth, Jackie Collins, Claire Francis, Stephen Leather, Wilbur Smith, Terence Strong, and Colin Forbes.
Mr. Moore has a hardcover artbook. Journeyman: The Art of Chris Moore
[/well]My Workflow, Broken Down.
A Strategy to Model the Ship Model.
I was too lazy to draw a new template for multiple orthographic views of the spaceship. Instead, I decided to block the shapes I needed, as they appear in the original painting. That meant making an instance of the base and moving it into place to work alongside the grid’s axis while seeing the effect of my edits against the image reference in the scene.
It took a bit of back and forth, but blocking the shapes with separate simple primitives was a great way to get the proportions correct before starting to get too far along into the model.
Once I had the proportions, I went about to find a way to stitch all the parts together to make better topology while still trying to keep the polygons low if I needed to make wholesale changes to the form. Before I got too engrossed with the ship, I needed to see it in context, so I moved on to modeling the rest of the scene.

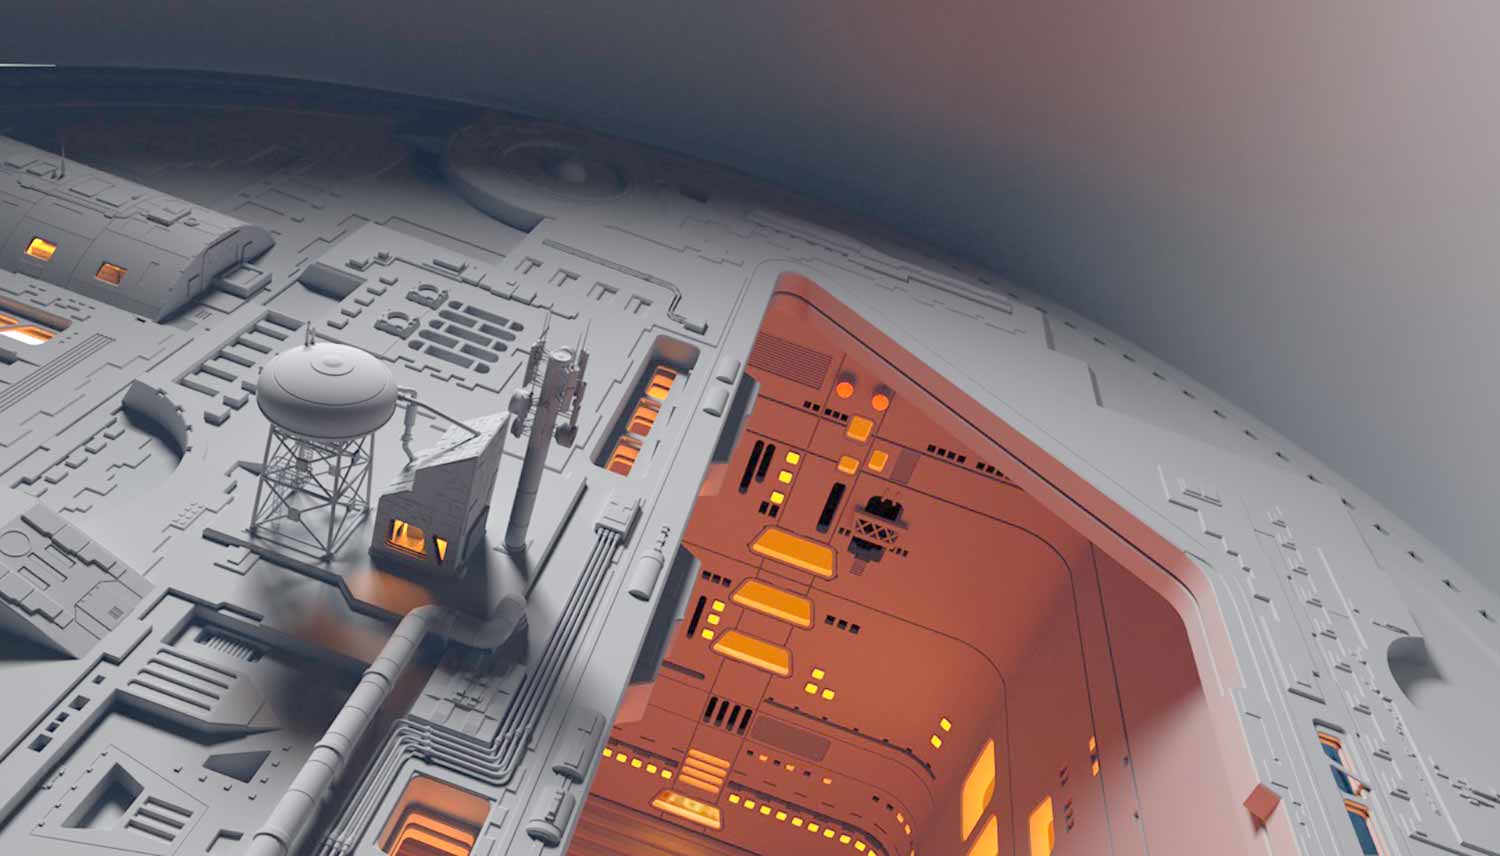
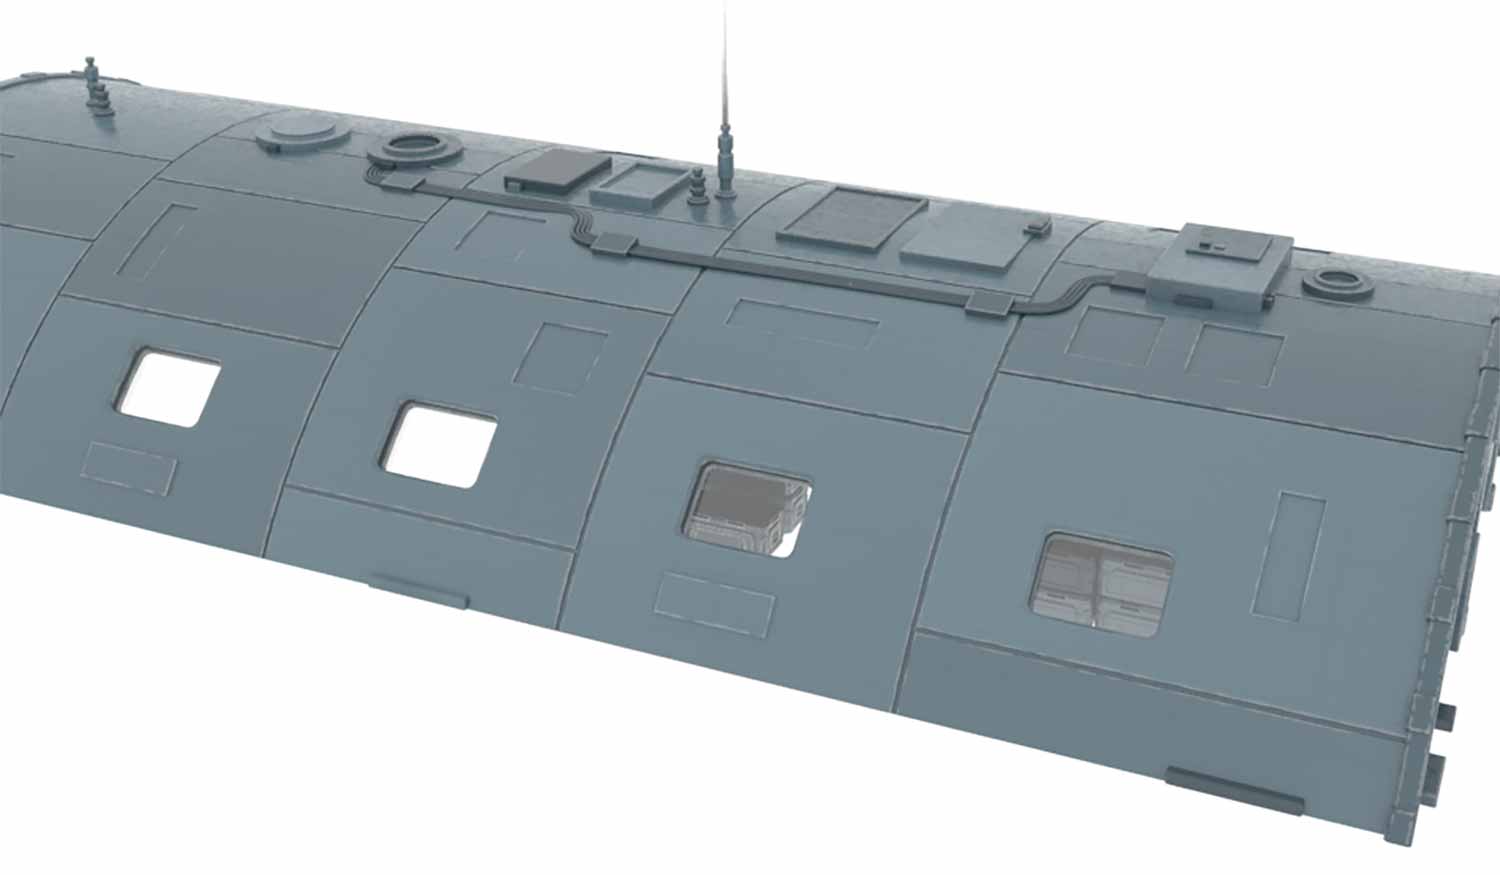
Blocking in the Station.
I started building the ship’s backdrop by place-matching a cylinder and then laying out some of the significant landmarks of the detailing on the floor to use those as monuments for the rest of the pieces. Essentially I was building a map of where everything was because a lot of that would tell me about the kind of topology I needed—for example, the opening for the hangar bay.
I worked on the flooring elements first, until finished, then moved on to creating the hangar bay and all the rooms there, and finally turned my attention to the back station walls and windows.

Working on the Buildings.
The station had a couple of structures on the main floor, including an above-ground looking hangar, a communications tower, and a storage tower and its connecting building. I chose to model each of these in separate files, eyeballing the proportions and details from the image instead of using image planes in the scene, referencing them back into my main 3D scene.


I took some liberties, adding some details to my models that weren’t in Moore’s painting and updated the communications tower to something more modern. A little more microwave than radio-wave.

The Hangar Bay Took the Longest.
It’s not that the bay represented something overly complicated; only my approach was. I chose to cut all the seams and stitch most of the elements back up, discovering how best to route the wires into something pleasant. It wasn’t the best way to work, but sometimes the only way to learn how to do something better later is by first doing it terribly.
I changed my modeling approach for the rest of the floor and had it all down pat by the time I got to work on the back walls.
Building the Back Walls.
The back walls’ workflow becomes much more simplified by taking parts of the cylinder, breaking them up, and then working out the topology and the placements for the windows and other details for that section of the panel. I had to make much of the rooms and their contents, as you can see into them in the original artwork.

Building the Rooms Behind the Gass.
I initially thought that I could “fake” some of the details you could see through the windows. Instead, I chose to “lightly” model the rooms and their contents for the larger, closer rooms. I built computer consoles, chairs, and other things that might add some visual interest.
I placed colored 2D planes that suggest details in the rooms for the windowed smaller spaces, using Moore’s artwork as a guide.
One Thousand Tiny Lights.
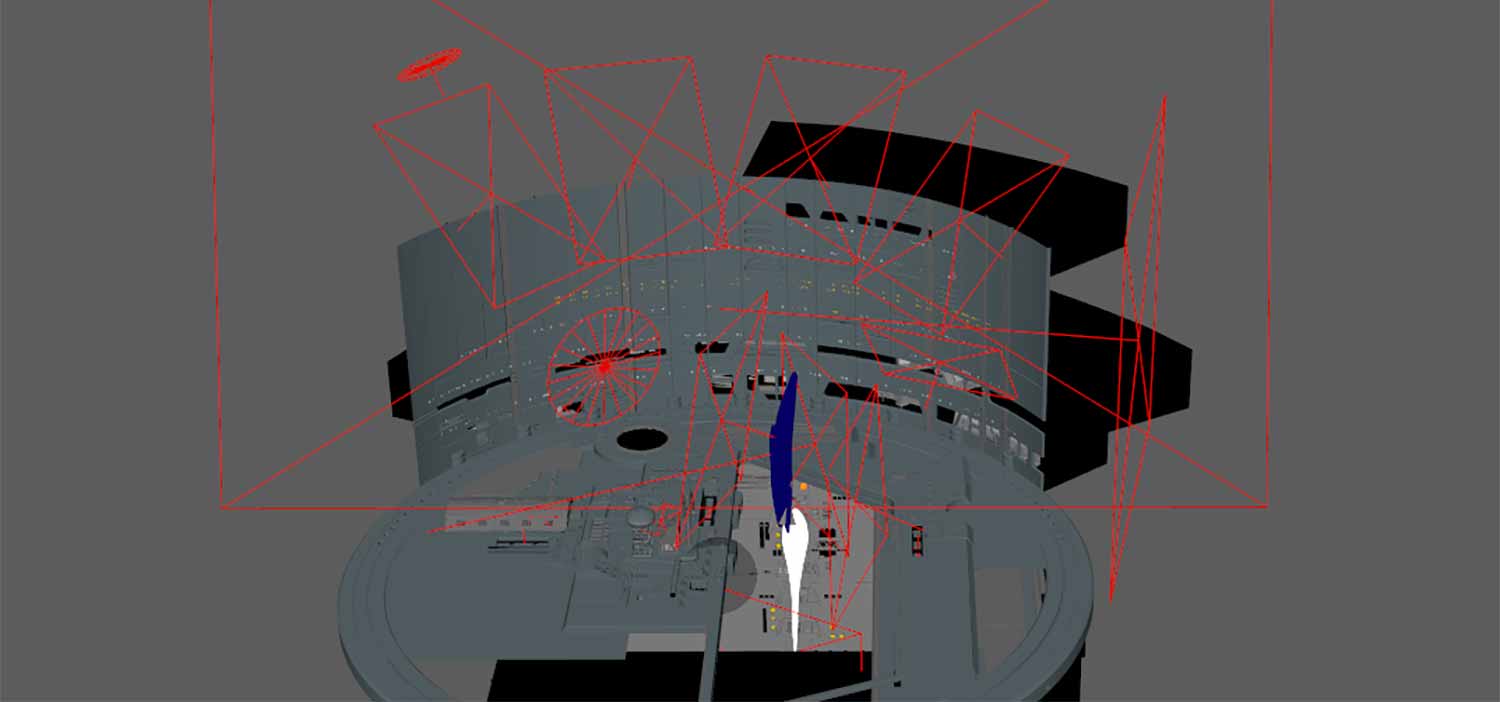
The final scene used many lights, but the hundreds of tiny lights along the back walls needed another method. Using light sources likely would have meant much more noise entering the rendering and linger render times. Instead, I used 2D planes along with non-illuminating aiFlat shaders.

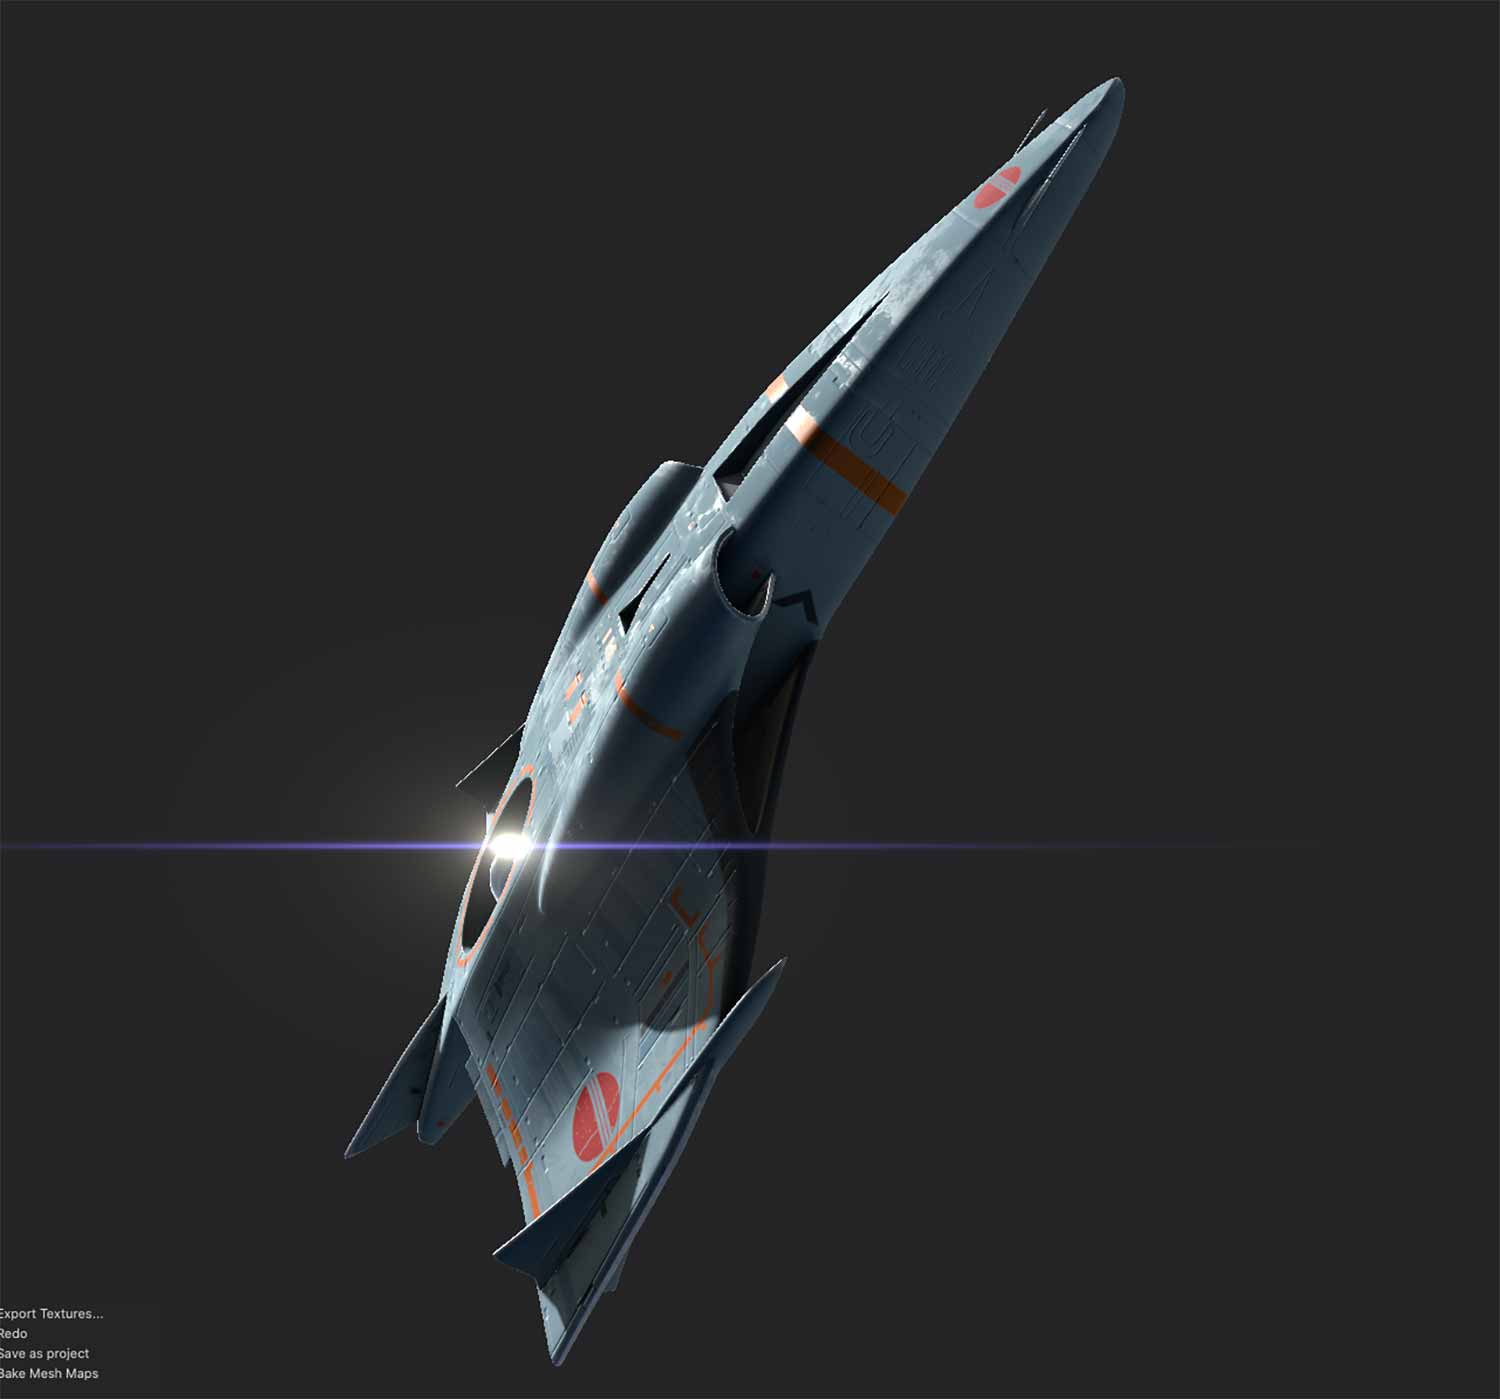
The rest of the lighting relied on Arnold’s light decay set to unique values for each of their purposes. It was this way that I could brighten and darken areas of the scene without dumping too much light into the scene and overexposing it. An example of this is the ship. One bright light brings it to the foreground, while a strong backlight adds those lovely rim highlight details, and both of those lights don’t affect the station at all.
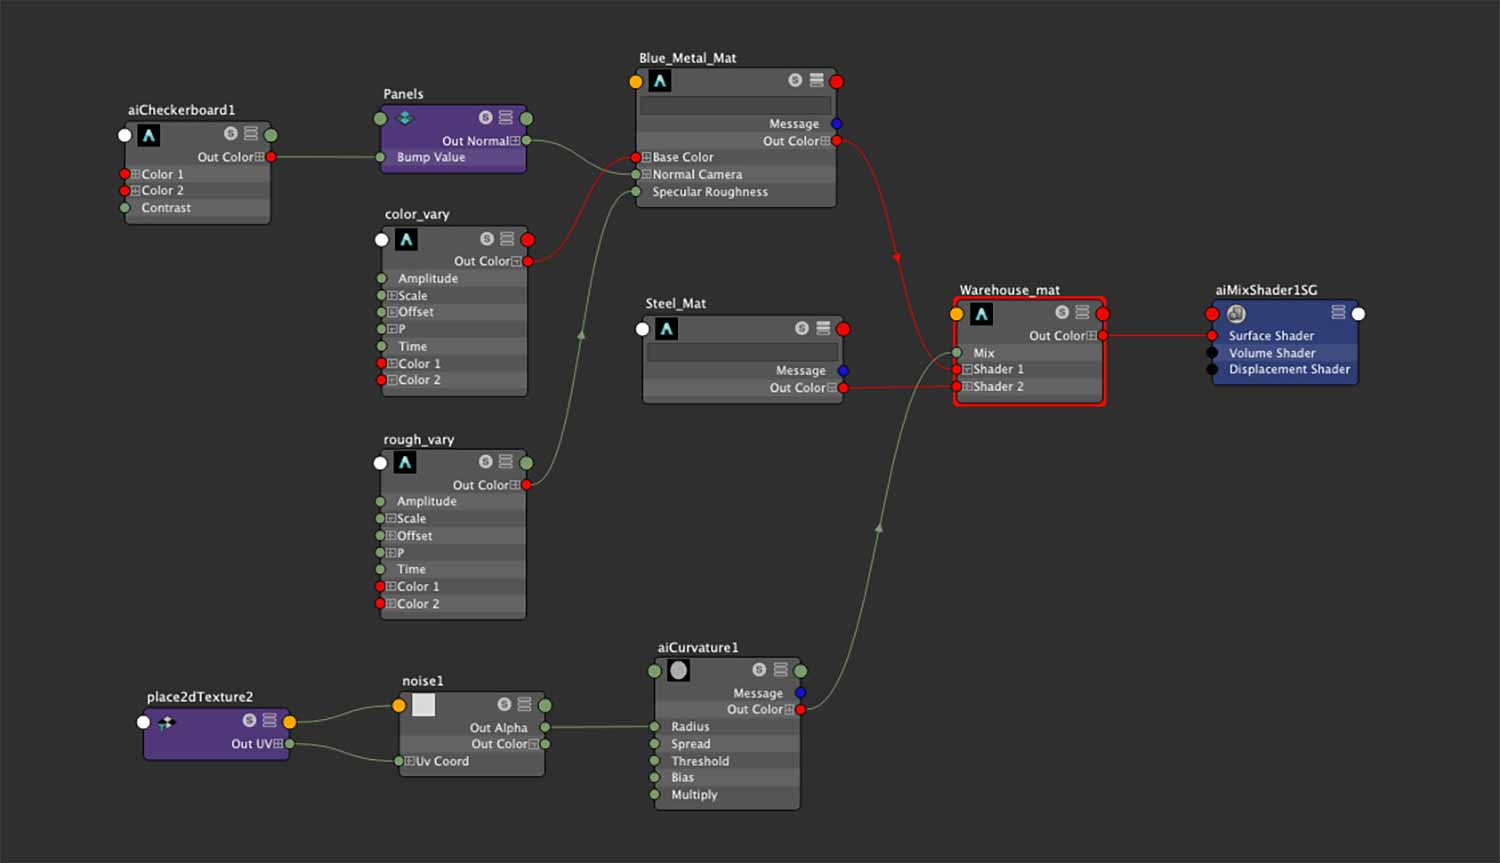
Texturing All the Things.
The station in the painting lent itself to simple shaders, using color, curvature, and mix. Instead of using a jitter to randomize color for some of the plating, I used an aiNoise node that used two colors, its coordinate space set to UV. That placed the color on the panels based on the shell’s position on the UV tile.
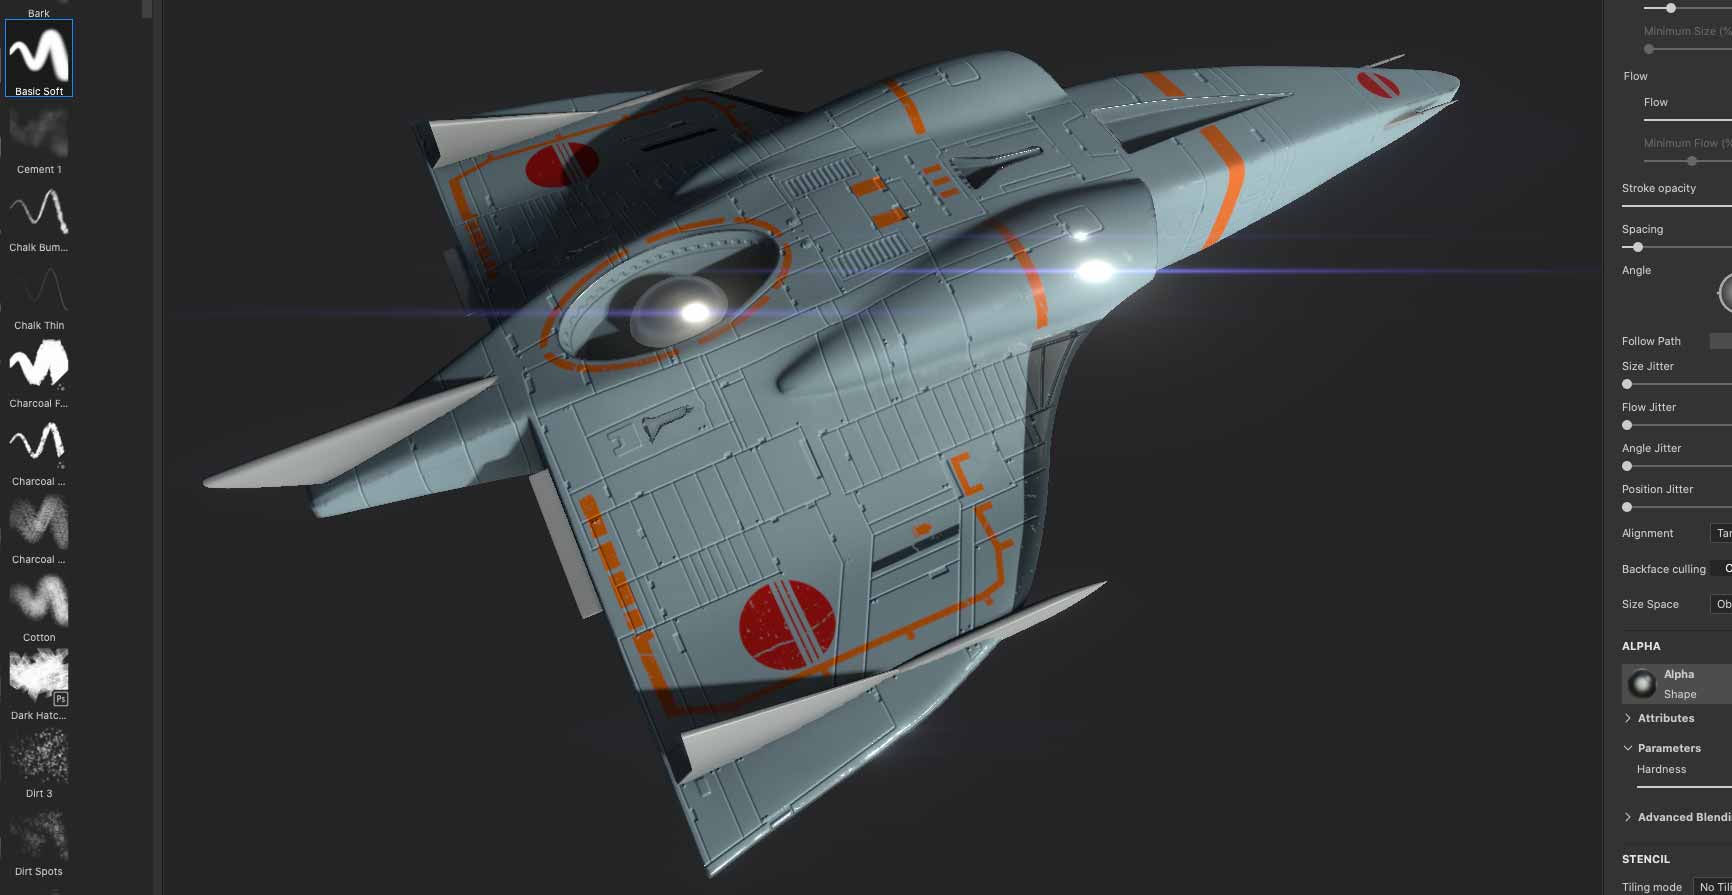
The Ship and Substance Painter.
The ship posed some texturing challenges as the graphics needed to match the original reference in placement. I could have used Maya’s paint tools to mark out where all the graphics should land, but instead, I thought it’s probably a good time to pick up and learn Substance Designer. That way, I could draw all the panels for the ship and place the graphics exactly where I need them without having to pop back and forth between Maya and Photoshop.

Putting it All Together.
While working, it was constructive, placing things in the scene to better see everything in context. There were small lighting changes, additions, and tweaks once all the elements had come together into the shot. I decided that it would be kind of cool to see the scene come to life with a short animation.
I animated the bay door opening and the ship launching out of the bay. I also worked to make some of the scenes within the rooms behind the windowed glass come to life with little animation bits in some computer monitors and lights flickering. Some of those items existed as isolated renders.
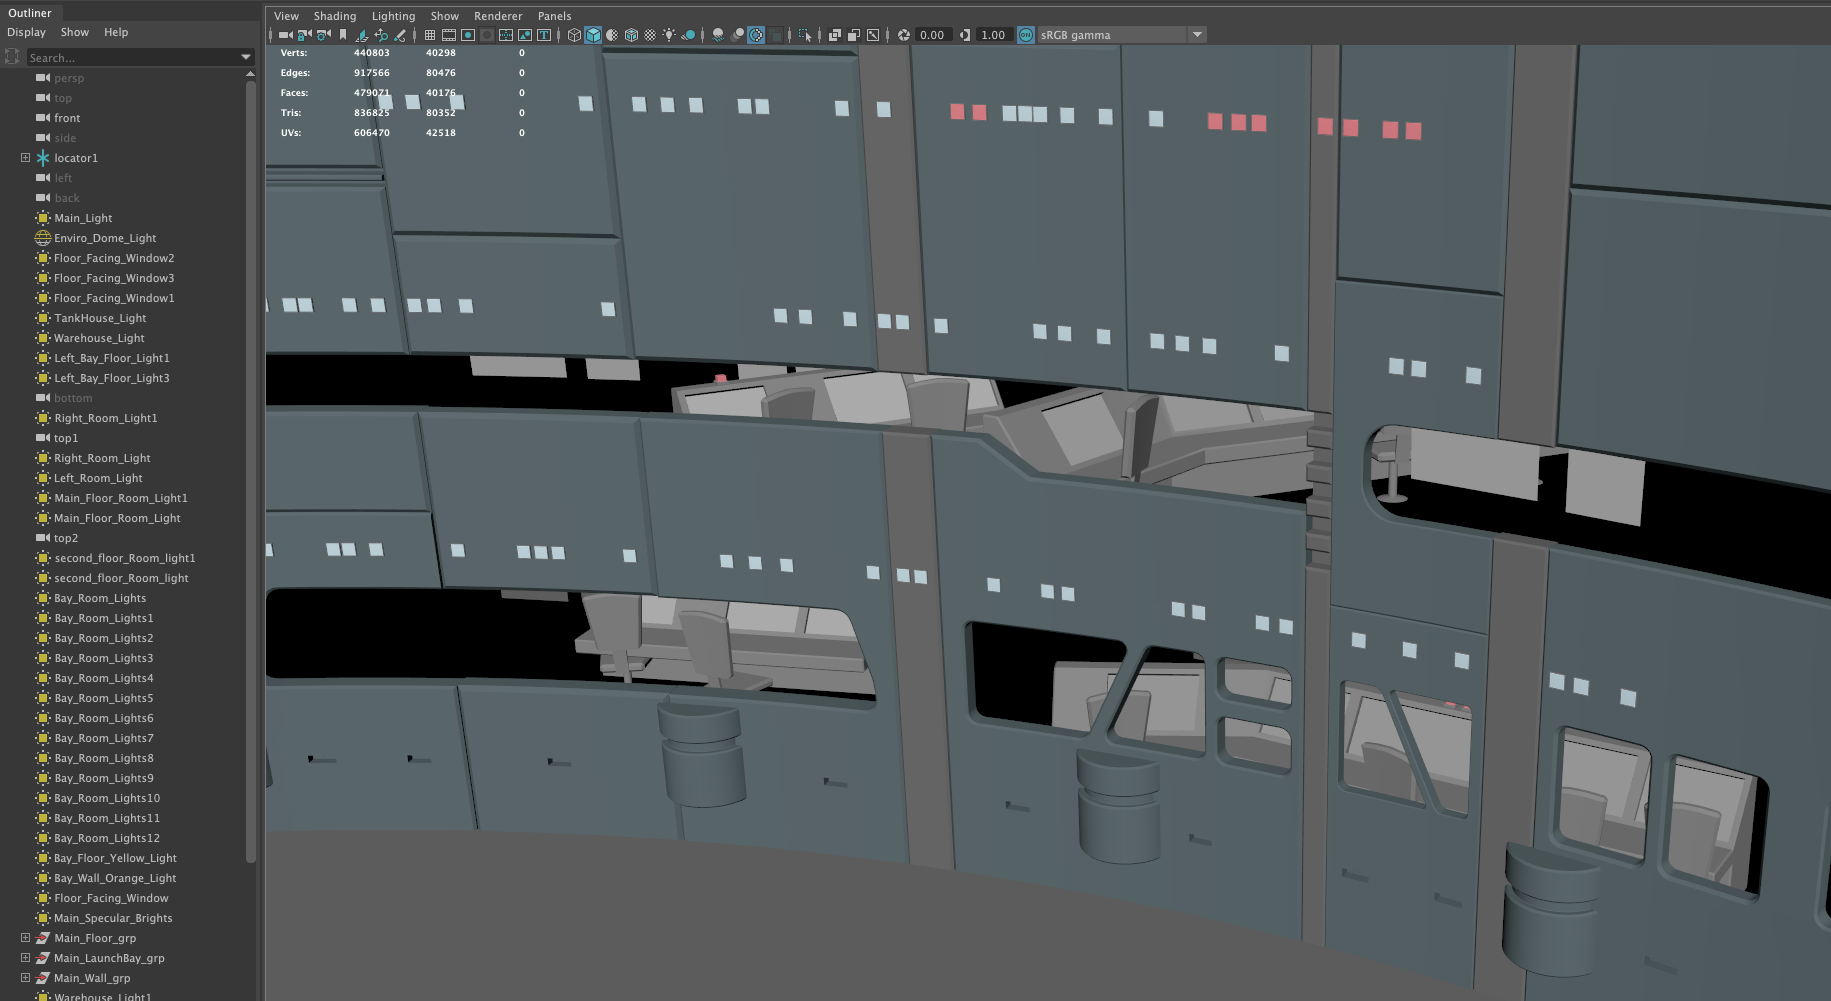
The whole set came in at 479,071 faces, which I think is pretty economical while I wasn’t trying to hit any polygon targets. I wanted to capture as much as possible “in camera” for the renders, and I succeeded in that regard. There are very few touchups or post effects, other than some color correction and glows added for the animation and the still image. Even still, I rendered Cryptomattes, and standard AOVs, including the required ones for an Arnold NOICE denoise pass.

The animation came together in Adobe After Effects, where I found the crypromatte workflow less than stellar. Working with multichannel EXRs in After Effects, while much improved over past incarnations (yes, I had the latest), is still clunky, unintuitive, and a trudge using cryptomatte layers as masks. My composition in Ae had a couple of dozen layers, and things ground to a halt comparatively to the other modern workhorse compositors out there today.
Final Thoughts.
I had tons of fun working on this project. While things like camera matching are reasonably straightforward, I still learned quite a bit through the process. I also switch how I work in Maya, using new methods to model and even tightening my viewport navigation, leaving the keyboard space bar behind. I gained fresh muscle memory working with one window (which has advantages) rather than relying on the multiple viewports and popping in and out of those with the keyboard space bar.
Let me know what you think of the project and if you’ve enjoyed this article!
[well]If you have a project that you’d like to breakdown for the site, send your post ideas and more information here.[/well]